Introduction
While speaking at a May 2003 news conference in Kabul, Secretary of Defense Donald H. Rumsfeld declared optimistically that Coalition operations in Afghanistan had “clearly . . . moved from major combat activity to a period of stability and stabilization and reconstruction activities.”1 Benign neglect over the next three years, however, allowed the Taliban to regroup, to adopt new tactics, and to expand their insurgency to the south and east.2 A British contingent of the International Security Assistance Force (ISAF) assumed command of Regional Command South (RC-South) in 2006, but encountered significant resistance when it attempted to challenge enemy activity in the area, particularly in Helmand Province to the southwest, where the enemy tended to operate with near impunity.3
Around the same time—as hostilities in Iraq began to decline—Commandant of the Marine Corps James T. Conway sought a more active role for his Service in Afghanistan.4 The number of Marine expeditionary forces in southwestern Afghanistan increased, with the type of deployed units growing steadily from a regimental to a brigade and finally to a corps-size presence. Two months after the arrival of Major General Richard P. Mills and I Marine Expeditionary Force (I MEF/Task Force Leatherneck) in April 2010, Marines established Regional Command Southwest (RC-SW) in Helmand and Nimroz Provinces.5 In addition to allowing senior leaders to focus on smaller geographic areas, the new command enhanced the Marines’ autonomy and allowed them to maintain an offensive posture while working to extend security throughout the region.
Operation Steel Dawn II—a joint raid against an enemy command center and logistics hub in Bahram Chah, Afghanistan, during October 2010—exemplified I MEF’s aggressiveness as well as the operational utility of the Marine air-ground task force. Nestled in a remote desert valley among the Chagai Hills, Bahram Chah is situated in the southernmost district in Helmand Province. Its isolation and proximity to the Pakistani border provided the Taliban with a safe haven ideal for pursuing a wide range of illicit activities. In addition to an al-Qaeda training camp and Taliban prison, the area housed facilities for producing improvised explosive devices (IEDs). The Bahram Chah bazaar served as a central location for smuggling fighters, weapons, ammunition, and explosives northward into Afghanistan and for moving refined opium, heroin, and other narcotics southward out of the country.6 Major General Mills considered it “a dark and evil place” and decided to deny the enemy sanctuary.7
Background
Coalition forces were aware of the town’s notorious reputation and had been raiding Bahram Chah on a regular basis for six years. Established by the Taliban in the mid-1990s, the town tripled in size between 2002 and 2005, with as many as 1,000 drug traffickers operating in the area on a busy day. Coalition forces first confronted the enemy sanctuary in May 2005 when the recently established Afghan Special Narcotics Force (ASNF) raided the town’s bazaar during a three-day operation to eliminate drug laboratories in southern Helmand Province. Although the drug traffickers fled to safety across the Pakistani border before the raid force arrived, ASNF personnel seized 250 kilograms of heroin, 2.5 tons of opium, and 3.5 tons of precursor chemicals used to manufacture heroin.8
The Taliban retaliated four months later by ambushing a company-size Afghan National Police convoy as it traveled south through a canyon located five kilometers north of Bahram Chah. The attack began shortly before nightfall, with insurgents firing down from all directions. When the fighting ended seven hours later, six vehicles had been seized or destroyed and 18 police officers had been killed, including the provincial deputy police chief.9
Not to be deterred, the ASNF raided Bahram Chah several times in April 2006. During the first operation, the antinarcotics force seized 75 kilograms of opium resin and arrested one suspect. During the second operation, the force arrested four suspects, seized 1,000 kilograms of opium, and destroyed an arsenal of heavy weapons discovered in an underground bunker. A third raid resulted in the death of one drug dealer as well as the seizure of substantial amounts of heroin, morphine, opium, and drug-making chemicals.10
In May 2007, a U.S. electronic surveillance unit (Task Force Orange) tracked Mullah Dadullah to Bahram Chah. Released two months earlier during a controversial prisoner exchange, Dadullah was a senior Taliban military commander and trusted advisor to Mullah Omar, the infamous one-eyed Taliban leader. After a small reconnaissance element determined that air strikes alone were insufficient to ensure Dadullah’s elimination, Afghan special operations forces and 50 commandos from C Squadron, British Special Boat Service (SBS), were inserted by two Royal Air Force Boeing CH-47 Chinook helicopters. Although immediately targeted by rifles, machine guns, and rocket-propelled grenades (RPGs), the assault force maneuvered forward against the walled compound’s 20 defenders. After a four-hour firefight, during which the commandos suffered four casualties, the facility was cleared and Dadullah killed.11
In October 2008, Afghani, Pakistani, and Arabic militants gathered at Bahram Chah. Coalition aircraft struck the group with precision munitions during a nighttime raid after ground reconnaissance forces positively identified the insurgents. Although an ISAF spokesman said that the target had been a small number of Taliban commanders, an Afghan official from Helmand Province claimed that two vehicles were destroyed and as many as 70 fighters killed.12
Bahram Chah may have escaped the Coalition’s attention in 2009, but southwestern Afghanistan did not. Arriving that spring as a vanguard of President Barack H. Obama’s eventual troop surge, 2d Marine Expeditionary Brigade deployed to Helmand Province and began clearing operations to break a stalemate that had existed between British and Taliban forces for three years. In July during Operation Khanjar (Strike of the Sword), three Marine battalions pushed south from Camp Bastion and occupied key population centers in Garmsir, Nawa-I-Bara- kzayi, and Khan Neshin.
The 2d Light Armored Reconnaissance Battalion (2d LAR) occupied Khan Neshin and established the Marines’ southern flank in the rural Khan Neshin District. Light armored reconnaissance forces continued to patrol the area during successive troop rotations, conducting counterinsurgency (COIN) operations along the lower Helmand River valley and interdiction operations across the southwest desert. Lieutenant Colonel Michael Martin, who commanded 4th LAR in December 2009, explained that while he would have welcomed an outpost at Bahram Chah, the battalion lacked sufficient resources and the town’s isolation would have placed his Marines at risk.13
Lieutenant Colonel Scott D. Leonard and 1st LAR (Task Force Highlander) assumed tactical responsibility for Reg-e Khan Neshin District, Helmand Province, (Area of Operations Mameluke) in May 2010. Task Force Highlander’s headquarters was located at Combat Outpost Payne, situated near the district center in Khan Neshin on the northern side of the lower Helmand River “fishhook.” Tasked with disrupting enemy operations throughout the region, Leonard assigned three of his maneuver companies to sectors of responsibility within the battalion’s 750-square-kilometer area of operations; a fourth company supported I MEF operations in the Kajaki District to the north.
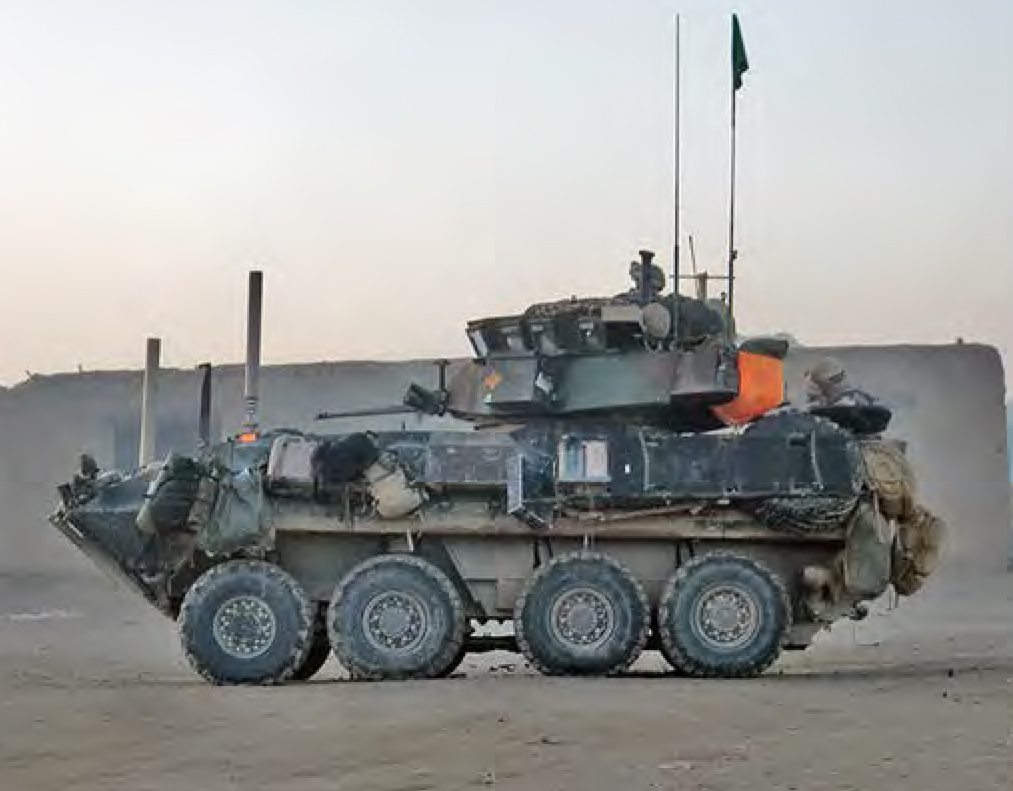
A light armored vehicle from Task Force Highlander (1st LAR) sits outside the Bahram Chah bazaar on 30 October 2010 during Operation Steel Dawn II. Defense Imagery 101029-M-0000A-001
Companies A and C, commanded by Major John R. Bitonti II and Captain Jason T. Ford, focused on COIN operations conducted along the north and south banks of the lower Helmand River. These distributed operations had dispersed platoons assigned to areas of responsibility. The Marines patrolled actively to engage the populace and secure the region’s thoroughfares, a physically demanding and dangerous mission that often became kinetic. Ambushes or strikes from IEDs buried along the dirt roadways were common and a constant concern. Each Marine company also worked diligently to develop the civil infrastructure, local government, and national security forces in their sectors.14
Farther south, operating in a more austere and sparsely populated area, Captain Adrian B. Haskamp commanded Company B. Lieutenant Colonel Leonard realigned the battalion’s assets to take advantage of the armored vehicle’s mobility and directed Company B to focus on interdicting the enemy’s clandestine transportation routes, or ratlines, running through southern Helmand Province. During long-range patrols that lasted up to 30 days and were conducted more than 100 kilometers from the closest support facilities, the company split into platoons and sections to search for contraband and to document the region’s demography. Assisted by intelligence, reconnaissance, and surveillance (ISR) assets that helped direct their efforts, the Marines detained 21 suspects for questioning, identified two enemy command and control nodes, and seized more than 4,400 kilograms of opium, 1,750 kilograms of ammonium nitrate, and 70 IED components. The Marines’ presence severely restricted Taliban movement and forced the enemy to shift its trafficking routes farther west and east into the desert.15
During 2010, as Coalition forces expanded their influence over southwestern Helmand Province, Bahram Chah received a greater amount of military attention. On 22 March, a combined patrol operating in Registan District stopped two vehicles transporting 725 kilograms of hashish to the enemy transshipment center.16 On 2 June, U.S. Air Force aircraft launched a missile and rocket at enemy positions that had fired on Coalition forces operating near Bahram Chah.17 Then, on 1 July, Afghan special operating forces and British SBS commandos again raided the town’s bazaar.18
In the latter action, commandos were inserted via CH-47 helicopters near the village of Haji Wakil. They arrived around 0200 hours and, shortly after, encountered enemy resistance. Forward progress remained difficult, and the commandos had to maneuver through an orchard while being fired on from all directions. The commandos did accomplish their mission, but Royal Marine Corporal Seth Stephens was killed and at least one other team member wounded during the five-hour firefight.19
Although clear evidence of enemy activity in Bahram Chah was found, the military operation had been costly. The commando’s ground assault force was unable to sufficiently support the withdrawal of the raid force, and 1st LAR—despite being designated the regional quick reaction force—was not contacted when the situation began to deteriorate. On 19 September, Coalition aircraft launched two rounds of precision munitions at the town’s bazaar, destroying an IED factory and 4,500 pounds of explosives material.20
Planning and Preparation
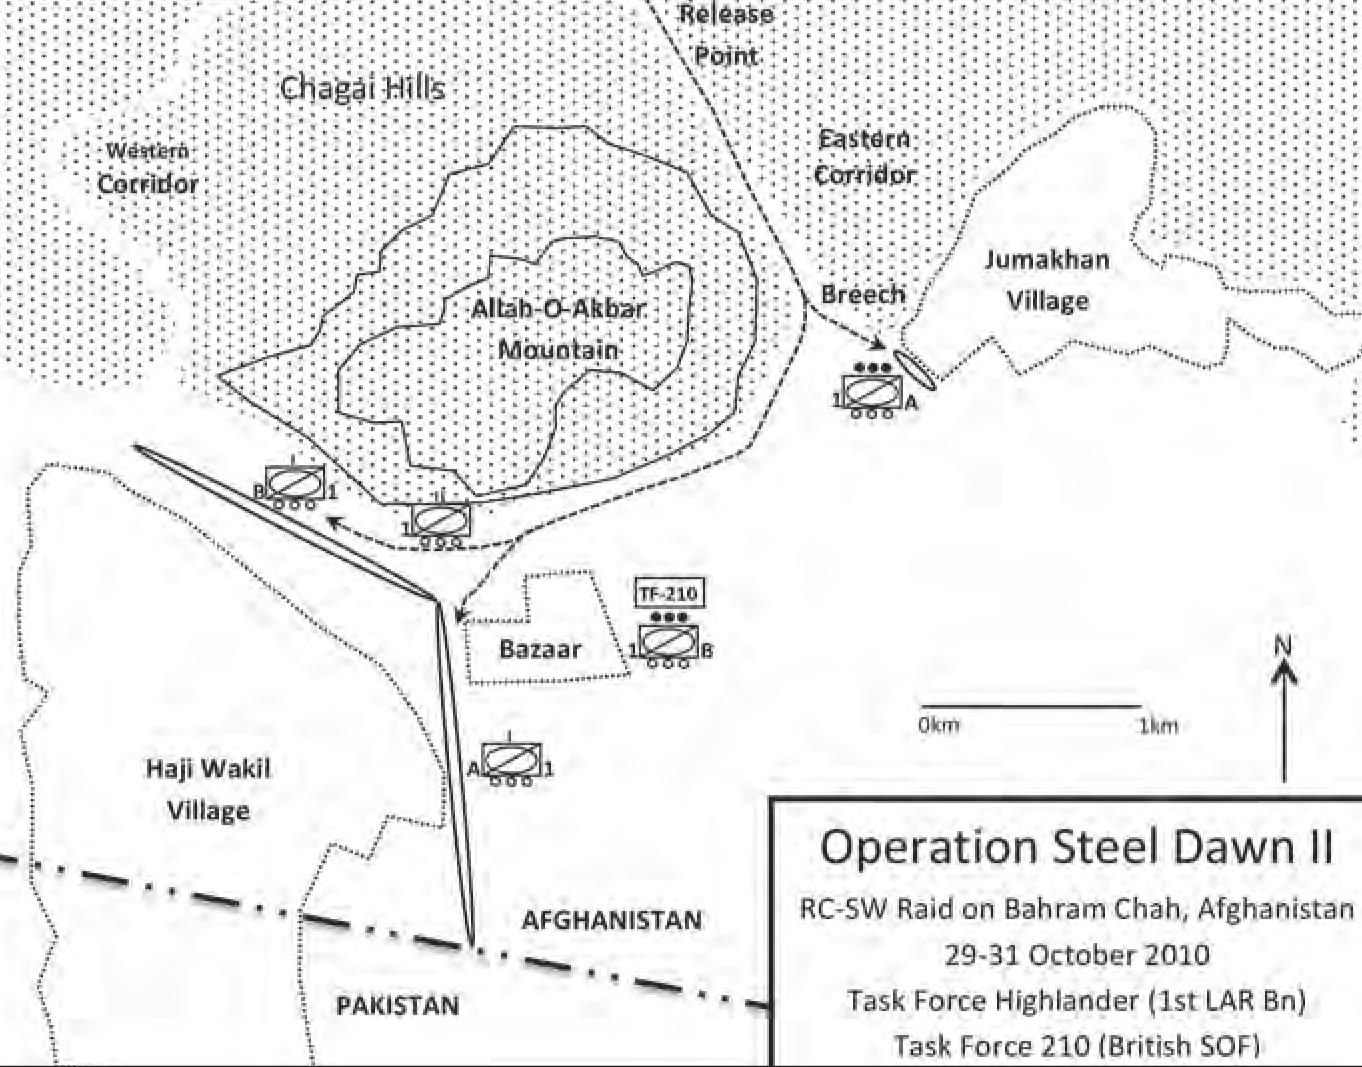
Lieutenant Colonel Leonard and those from Task Force 210 discussed the problems with Bahram Chah that summer, but waited until early October to pro- pose a raid of the enemy’s logistics base. The proposal was presented to Brigadier General Joseph L. Osterman and 1st Marine Division (1st MarDiv Forward) staff at Camp Leatherneck.21 During an operational debrief, Leonard and his British counterpart described the tactical situation and pitched the concept for near-simultaneous air and ground assaults. The plan called for two companies driving down from the north to screen the bazaar from adjacent residential areas to the west and east, enabling the commandos to fly in and strike the objective.22 By attacking before the Taliban had an opportunity to withdraw southward into Pakistan for the winter, Coalition forces could delay the production of IEDs and disrupt enemy operations into the summer of 2011.23
Around 10 October, 1st MarDiv endorsed the concept, adding slides to illustrate the mission before submitting it to I MEF (Forward) five days later.24 Major General Mills directed the planning to continue and forwarded the proposal to the ISAF Joint Command (IJC) for approval. In the end, the plan took about two weeks to wend its way up the chain of command. At some point, ISAF briefed the Afghan government, which in turn notified the Pakistani government 24 hours in advance of the raid, enabling the Pakistani Army to withdraw its border position—but this may have also alerted the Taliban.25
Most of the deliberate planning and preparations occurred at Combat Outpost Payne.26 One of the more difficult issues the planners had to address was targeting. Although the first 140 kilometers of the proposed route to Bahram Chah included open desert, the final 20 kilometers involved traveling through one of two narrow mountain passes to reach the objective. Aware of the region’s recent operational history, the Marines knew they would have to eliminate the enemy’s defensive positions along the pass in advance of the movement. They developed the plan according to doctrine, incorporating shaping fires, suppressive fires, and fires in support of obstacle breaches. They also observed Standard Operating Procedure (SOP) 398, which governed the use of supporting fires in theater. Captain Nicolas S. Rapkoch, 1st LAR’s fire support coordinator, spent many evenings in discussion with the battalion lawyer, struggling to address the engagement requirements before seeking ISAF approval through the IJC.27
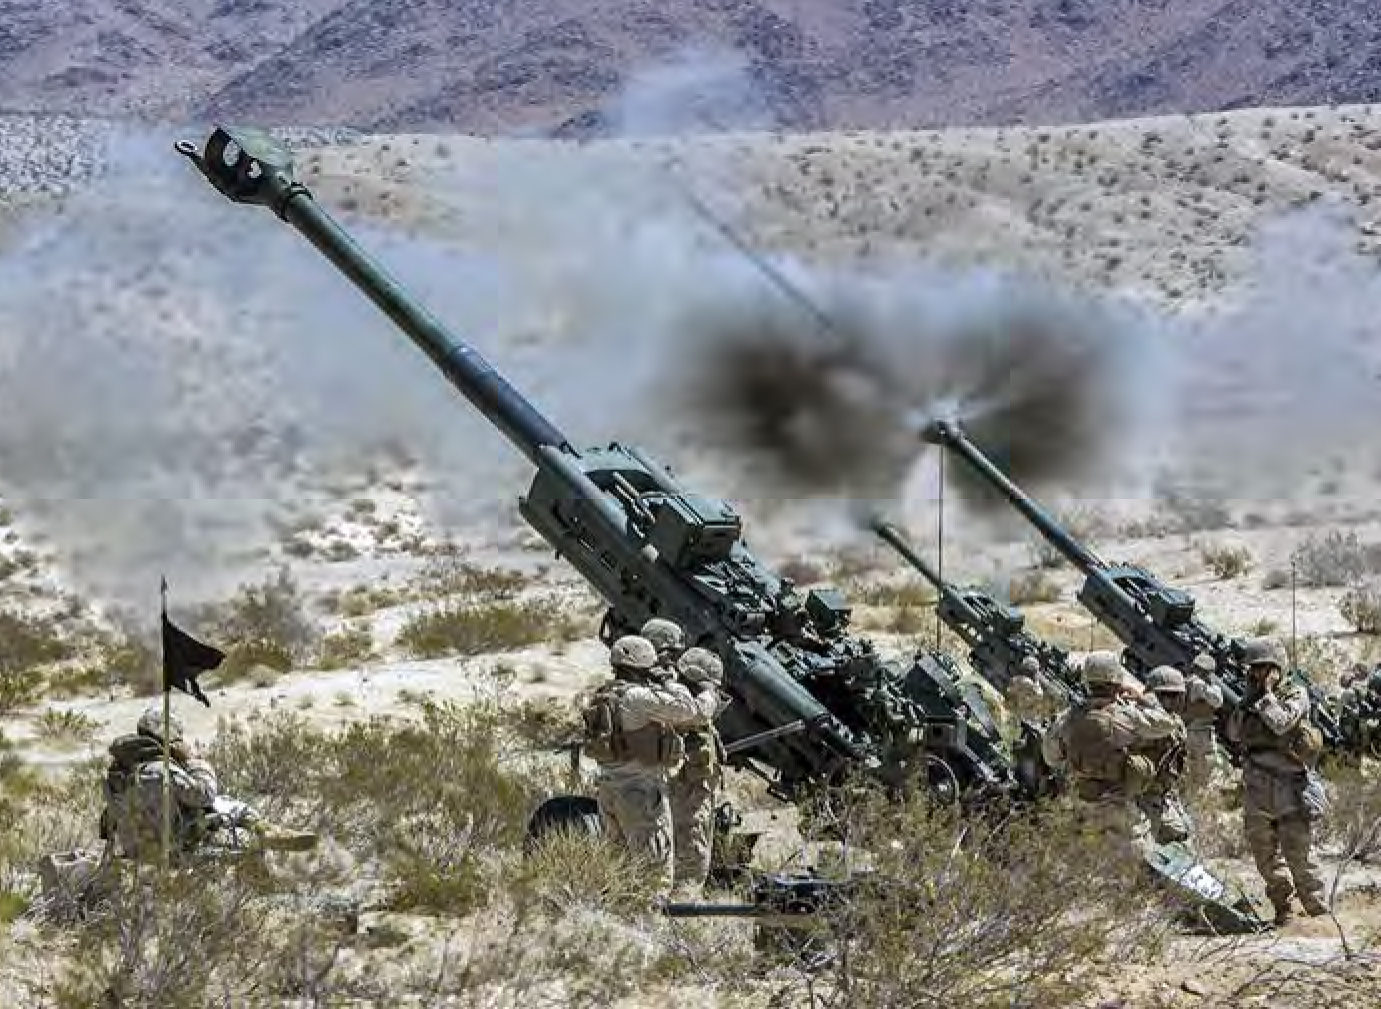
Marines with Battery B, 1st Battalion, 11th Marines, fire the M777A2 howitzer during Exercise Desert Scimitar 2014 at Marine Corps Air Ground Combat Center Twentynine Palms, California. Photo by Cpl Ismael E. Ortega, Defense Imagery 140514-M-RD023-096
Operation Steel Dawn II would ultimately involve “one of the most robust fires packages ever executed in Afghanistan,” including a wide variety of offensive aircraft: Rockwell B-1 Lancer bombers, Fairchild Republic A-10 Thunderbolt II attack aircraft, Lockheed AC-130 Spectre gunships, McDonnell Douglas F/A-18 Hornet fighters, and Bell AH-1 Cobra attack helicopters.28 While the IJC may have understood the rules of engagement, Captain Rapkoch later complained, the command did not necessarily appreciate their spirit or intent. The IJC chose to deny some preassault fires against fighting positions associated with residential compounds near Bahram Chah because the targeting requirement for two corroborating sources of intelligence in habitable areas was not met.29
Marine planners understood that dust or thunderstorms could inhibit the use of aircraft, so an artillery presence would be necessary to ensure an all-weather fire support capability.30 That task fell to Lieutenant Colonel Adolfo Garcia Jr. and 1st Battalion, 11th Marines. The artillerymen were already well known to 1st LAR—the two battalions had worked together during an Enhanced Mojave Viper exercise at Marine Corps Air Ground Combat Center Twentynine Palms, California, shortly before deploying. After arriving in Afghanistan in May 2010, the 1st Battalion, 11th Marines, established its headquarters at Fire Base Fiddler’s Green. The headquarters, one rocket battery, and three cannon batteries operated eight firing positions distributed throughout I MEF’s area of operations. In addition to supporting Regimental Combat Teams 2 and 7, the 1st Battalion, 11th Marines, had also secured a portion of Route 605 in Marjah and conducted COIN operations in the Kajaki District.31
Because Bahram Chah was located outside the range of the artillery pieces positioned at Combat Outpost Payne, artillerymen had to accompany the raid force. To facilitate coordination during the operation, Lieutenant Colonel Garcia formed an artillery group under the command of his operations officer, Major David J. Grabow. This special purpose task organization included the battalion’s jump command post; 1st Platoon, Battery L, equipped with three 155mm light howitzers; and 3d Platoon, Battery S, equipped with the High Mobility Artillery Rocket System (HIMARS).32
In preparation for the raid, Battery S, under Captain Jeffrey S. Curtis, conducted test fire ranges at Camp Leatherneck on 11 October and then at Combat Outpost Payne on 14 October.33 The 3d Platoon also performed a route reconnaissance to a proposed assembly area to ensure the desert terrain was suitable for supporting the heavy HIMARS during travel.34 In the meantime, Captain Bitonti and Company A received a warning order, switched areas of responsibility with Company C, remounted their armored vehicles, and embarked on an in- tense week of refresher training and maintenance.35
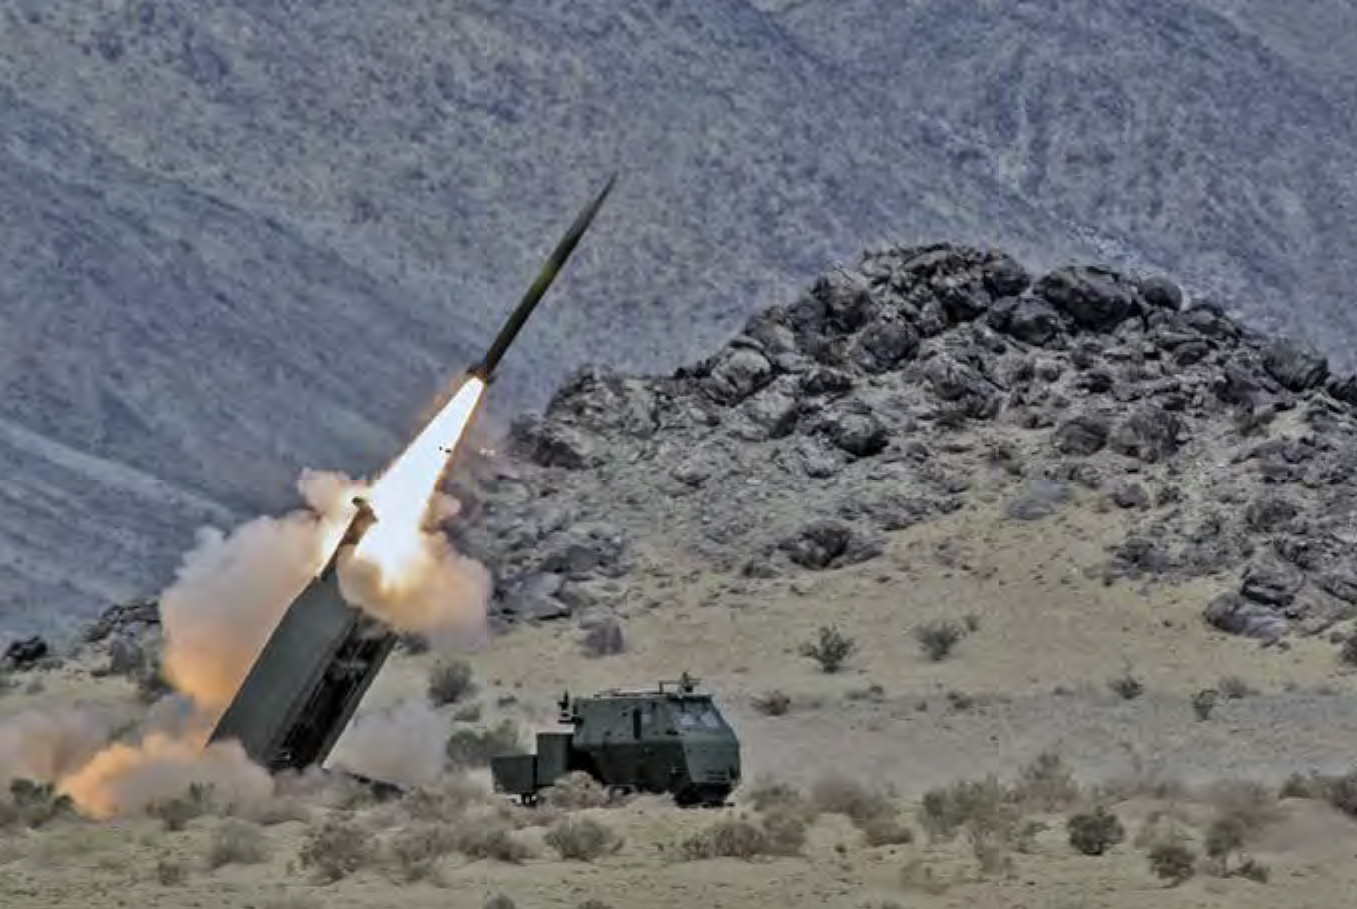
Marines with Battery S, 5th Battalion, 11th Marines, fire the M142 High Mobility Artillery Rocket System during Exercise Desert Scimitar 2014 at Twentynine Palms. Photo by Cpl Ismael E. Ortega, Defense Imagery 140518-M-RD023-077
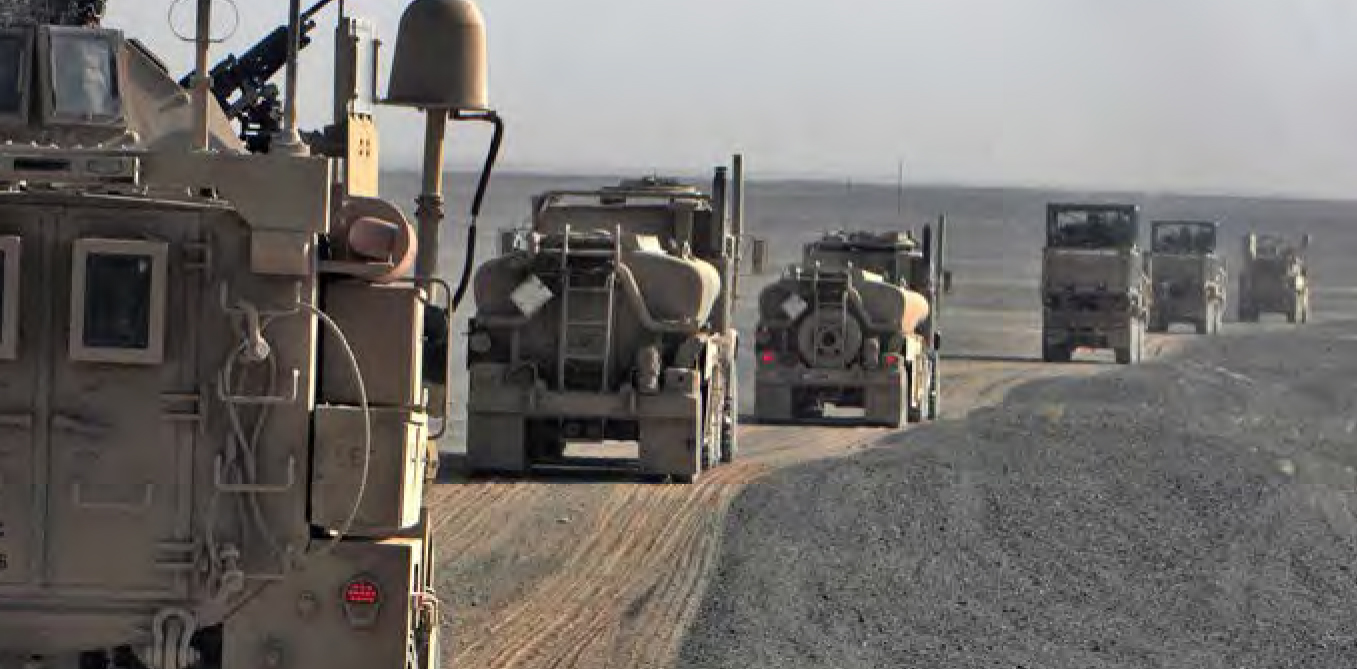
A convoy from Combat Logistic Battalion 3, 1st Marines Logistics Group (Forward), heads to Combat Outpost Payne on 21 October 2010 to support Operation Steel Dawn II. Photo by Cpl Paul D. Zelner, Defense Imagery 339079
On 19 October, organizations participating in the operation moved toward Combat Outpost Payne, which served as an initial staging area for Task Force Highlander. The 1st Battalion, 11th Marines’ communications platoon, under Captain Ronnie L. Creech, began to actively support Operation Steel Dawn II, providing the equipment and personnel necessary to operate the forward combat operations center.36 Lieutenant Colonel Leonard issued an operations order to key leaders the following day and, on 22 October, the participants reconvened to conduct a detailed rehearsal of concepts drill. Majors Matthew Miller and Jon A. Custis, the 1st LAR’s operations and executive officers, respectively, walked the participants through the operational sequence and corrected problems identified during the group exercise.37 Lieutenant Colonel Garcia later noted that “The thorough planning and rehearsals conducted prior to the raid ensured the seamless integration of these elements and refined the command and control of the raid force.”38 Companies A and B departed Combat Outpost Payne the next day, heading in opposite directions to conduct interdiction operations for five days. As part of Lieutenant Colonel Leonard’s deception plan, the companies intended that any Taliban groups monitoring the Marine units’ activities would interpret the movements as routine patrols.39 Shaping and reconnaissance operations conducted in support of Steel Dawn II (e.g., Operations Steel Dawn I and Press 16) also began on 23 October.40 Gunnery Sergeant Aaron J. Abrams, Company A’s 2d Platoon sergeant, served as Task Force Highlander’s liaison to Task Force 210 during Operation Press 16. The British reconnaissance patrol collected information on the proposed route, identified enemy observation posts covering the mountain passes, and observed activities in and around Bahram Chah.41
On 25 October, Major Custis began to push command and support elements south. The intermediary goal was to establish a logistics staging area (LSA) about 60 kilometers from Combat Outpost Payne.42 Lieutenant Colonel Leonard, who considered Bahram Chah the “nexus of all bad things . . . happening” in Helmand and Kandahar Provinces, spoke candidly to his Marines before departing: “We will go into the Bazaar of Barham [sic] Chah and say, ‘We’ll come here any time we want—you can’t stop us. You don’t get to operate with impunity.’ We will tell them, ‘If you want to come back and rebuild this place, go ahead. We will be back in three months. ”43
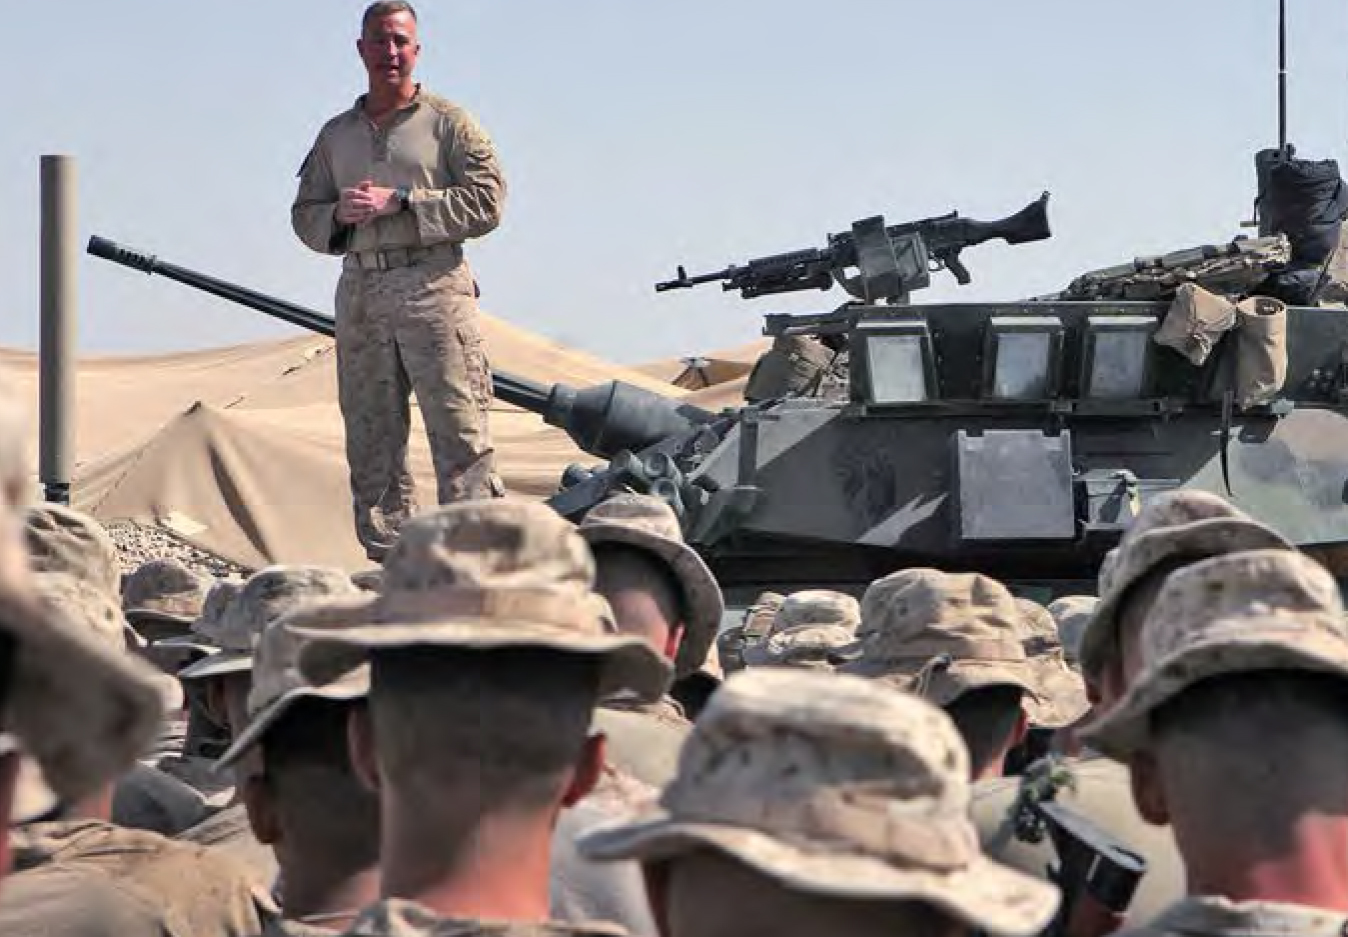
LtCol Scott D. Leonard, commanding officer of 1st LAR and Task Force Highlander, addresses Marines participating in Operation Steel Dawn II at Combat Outpost Payne on 25 October 2010. Photo by Cpl Paul D. Zelner, Defense Imagery 101021-M-4388Z-004
The LSA was situated in a large wadi (dry stream bed) in the middle of the desert, a site specifically chosen for its remoteness. Task Force Highlander assembled 178 vehicles and 1,100 personnel into a raid force in the isolated location without being observed. Getting to the LSA was difficult as sand dunes and rough terrain hindered the progress of the heavily laden vehicles.44 During the weeklong operation, for example, one M88 armored vehicle crew recovered or repaired 53 vehicles.45
Upon the artillery group’s arrival at the LSA, Major Grabow established a command and control node to support other task force elements during the operation. The communications platoon from 1st Battalion, 11th Marines, provided host services via multiple tactical satellite radio networks. Due to its communications capabilities, the artillery command element also fulfilled the role of camp commandant.46
Combat Logistics Battalion 3 Marines provided critical assistance to Task Force Highlander throughout the operation. Motor Transport Company B, under Captain Matthew J. Neely, provided eight pallets of food and 15,000 gallons of water as well as fuel, ammunition, and other supplies via combat logistics patrols and helicopter support teams. Marines from Landing Support Platoon, Headquarters and Service Company, off-loaded supplies at multiple sites,47 and the 1st Medical Battalion’s Shock Trauma Platoon provided a mobile trauma bay.48
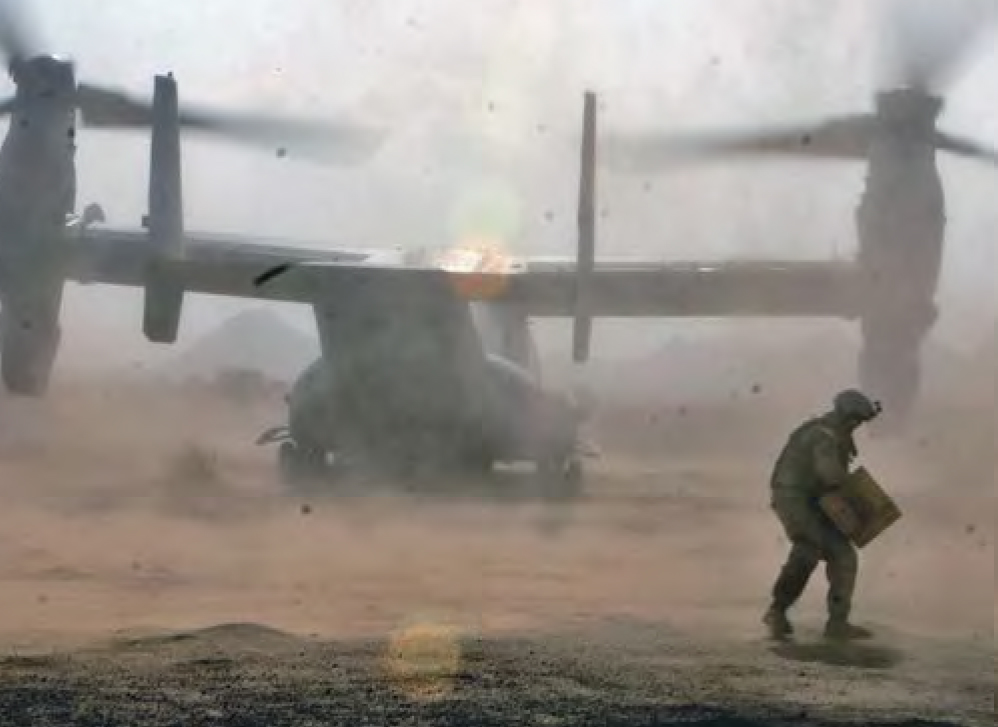
Supplies are offloaded from a Bell Boeing MV-22B Osprey with VMM-365 at a remote logistics staging area on 29 October 2010. Photo by Sgt Derek Carlson, Defense Imagery 101029-M-4388Z-003
Marine Wing Support Squadron 373 also contributed significantly to the operation, constructing a forward arming and refueling point (FARP) near the LSA.49 A Bell Boeing MV-22B Osprey from Marine Medium Tiltrotor Squadron 365 (VMM-365), commanded by Lieutenant Colonel Craig C. LeFlore, was the first aircraft to land at the FARP on 29 October and provided assault support during the operation.50 Captain Patrick W. Richardson, a Bell AH-1 Super Cobra pilot with Marine Light Attack Helicopter Squadron 369, also operated from the FARP. Richardson later explained that “We were able to spend 15 minutes in transit, 20–30 minutes to refuel and rearm, and get back to support troops on the ground.”51 The facility also had on-hand casualty evacuation capability.
On 26 October, operating farther south near the objective area, Gunnery Sergeant Abrams and the British reconnaissance patrol conducted a night mortar raid against Bahram Chah. The commandos established two observation posts—situated on high ground running along each side of the proposed route—and fired at enemy positions previously designated as on-call targets. When the rounds began to impact, the enemy fired flares into the night sky and attempted to flee in vehicles. Abrams reported that numerous headlights illuminated a large traffic jam.52
The next day, the reconnaissance patrol rejoined Task Force Highlander at the LSA and delivered their account to Lieutenant Colonel Leonard. Although Leonard had originally intended to follow the western pass through the mountains, the patrol reported that the circuitous route would take the convoy directly past the city’s main residential area. Shortly before departure, the route was changed to the eastern pass.53
Movement to Contact
The raid was originally scheduled to begin on the evening of 28 October, but torrential rains resulted in a one-day weather delay.54 Around 1800 hours the following evening, Task Force Highlander formed a column and headed south to Bahram Chah.55 The Marines first needed to reach the line of departure on the north side of Chagai Hills—20 kilometers short of the bazaar—and then maneuver through the mountain pass to arrive at a designated release point by 0700 hours the following morning.56 The time requirement deepened the Marines’ sense of urgency; if they failed to arrive on time, Task Force 210 would have to execute its portion of the mission without ground support. Lance Corporal Ramirez, a vehicle driver from Company A, later recalled that the Marines had traveled light and fast—bringing only water, chow, ammunition, and a one-day pack per man.57
Company A held the lead position in the 85-vehicle convoy, and Captain Bitonti divided the unit into two sections for movement: 2d Platoon with attachments from 3d Combat Engineer Battalion, company headquarters, and logistics vehicles followed by 1st and 3d Platoons. The engineering assets included assault vehicles with rocket-propelled mine clearing line charges and a D7 bulldozer and M870 semitrailer for breaching three IED-laden choke points. The battalion’s jump command post was next in line, followed by Company B and the logistics train.58 Major Grabow and the cannon platoon brought up the rear, while Captain Curtis and the HIMARS platoon remained at the LSA.59 Major General Mills and representatives from several U.S. government agencies also accompanied the raid force.60
Working its way south, Company A marked the route and relayed situational information to the remainder of the convoy. Gunnery Sergeant Abrams, who guided the lead platoon, recalled that the sky had been clear when the company began the road march. However, a solitary black cloud followed the Marines, eventually bringing rain, thunder, and lightning. During the approach, the Marine company had expected to strike numerous IEDs, but none were encountered.61
Task Force 210 approached the objective area aboard CH-47 helicopters, relaying position reports to Marines as it crossed airborne phase lines. When the British were approximately two minutes from the landing zone, at around 1940 hours, Task Force Highlander initiated the kinetic portion of the operation.62 A B-1 bomber attacked enemy fighting positions and observation posts along the Marines’ axis of advance and near the commandos’ ingress point. During two passes, the bomber struck eight preplanned targets with laser-guided 2,000-pound bombs.63
As the convoy reached the north side of the Chagai Hills, the logistics train and artillery group pulled off the road and established a functional firing position in only 15 minutes.64 While Task Force Highlander maneuvered along the eastern corridor toward Bahram Chah, the artillerymen shot illumination rounds over the western pass in an effort to deceive the enemy on which direction the Marines would initiate the attack. When Company A approached the first IED-laden choke point, the Marines spotted Taliban fighters massing along high ground paralleling the canyon. At Captain Rapkoch’s request, the cannon platoon began to shoot preplanned preparatory fires against enemy defensive positions, shifting in concert with the task force’s advance, effectively suppressing the enemy with at least one sympathetic detonation and allowing the convoy to continue forward. At a second choke point, the cannon platoon again suppressed Taliban forces.65 In all, the platoon fired 107 high explosive rounds in support of the breaches.66 Task Force Highlander also employed close air support to strike the enemy.67 Lance Corporal Ramirez recalled the surreal experience of riding through the night with bombs exploding near the objective, artillery impacting along the ridgelines, and illumination rounds drifting downward over the western pass.68 Sergeant Stuart R. Sanford, a vehicle commander in Company B, similarly remembered an “awesome fireworks show” as the “artillery was blowing the hell out of everything.”69
The journey south was not without difficulties for Coalition forces. At one point, the trailer hauling the bulldozer became stuck and, when Marines tried to pull it free, an axle broke. While leaders contemplated what to do, a lance corporal climbed into the driver’s seat, backed the bulldozer off the trailer, and asked “Hey, gunny, which way do I go?” The gunnery sergeant pointed south, and the young Marine moved out at three and a half kilometers per hour.70 On another occasion, the combat engineer support element led a convoy down the wrong corridor. When 3d Platoon Commander First Lieutenant Michael D. Wright realized what happened, he initiated corrective action and, on Captain Bitonti’s orders, assumed maneuver control of the engineer element.71
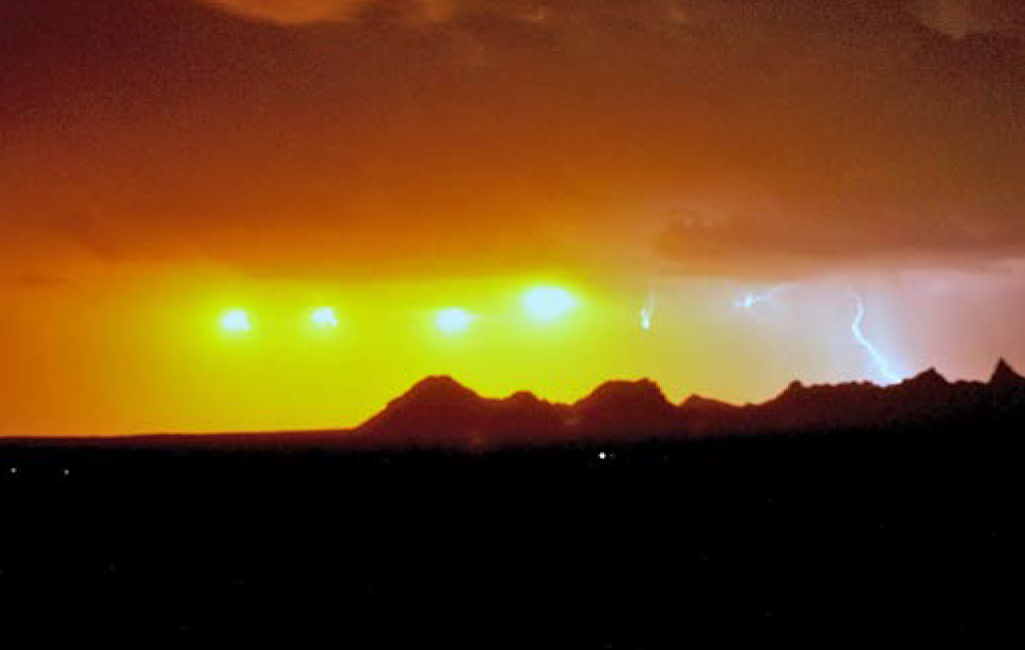
Artillery illumination and a desert storm light up the night sky over the Chagai Hills as Task Force Highlander maneuvers south through a mountain pass toward Bahram Chah on 29 November 2010. Photo by Sgt Derek Carlson, Defense Imagery 101029-M-1842C-002
Progress was swift and Task Force Highlander reached its designated release point, a hilltop near the southern entrance to the mountain pass, around 0430. Having arrived two hours before sunrise and well ahead of schedule, the Marines received word that Task Force 210 was not ready to launch the attack and halted the convoy. As Marines established a hasty blocking position and waited in the dark, the infrared strobe lights on the antenna of the armored vehicles reminded Captain Rapkoch of a traffic jam on U.S. Interstate 95.72
Shortly after being inserted about three miles southeast of the bazaar, the British commandos began to receive small-arms fire. In response, the HIMARS platoon fired three GPS-guided rockets into the buildings where the gunfire emanated. Before long, the commandos proceeded to secure the perimeter. They established preliminary positions on each corner of the bazaar and an observation post on a mountain peak northwest of Bahram Chah; they also marked lanes for the armored vehicles to follow. The Marines then surged forward.73
Actions on the Objective
The road sloped down beyond the release point, first heading southeast and then cutting sharply to the southwest before opening into a three-kilometer- wide valley.74 The smaller village of Jumakhan was situated to the east, the larger village of Haji Wakil to the west, and the bazaar near the middle. When First Lieutenant Sean T. Knapp led the engineer platoon forward in the dark to breach the entrance to the objective area, the platoon encountered small-arms, machine-gun, and RPG fire. First Platoon, Company A, under First Lieutenant Jonathan R. Walaski, moved forward to establish a temporary blocking position and to provide cover fire; the company quickly suppressed the enemy. After the rocket-propelled line charges twice misfired, Captain Bitonti pushed forward with the mine rollers. Around this time, the bulldozer emerged from the pass.75
The Marines 1st Platoon quickly maneuvered past the engineers, crossed into the objective area, and swung east to establish the assigned blocking position along the southwest side of Jumakhan. Although intelligence had predicted little if any resistance from the village of single-story adobe dwellings, as soon as the Marines pulled into position, they encountered additional small-arms, machine-gun, and RPG fire. The Marines again suppressed the enemy with ease.76
With Lieutenant Walaski’s platoon shielding the mountain pass exit, the remainder of Task Force Highlander was able to flow unimpeded into the objective area.77 Company A passed through the British lines while skirting along the north side of the bazaar and then swung south to cordon off the southwest side of Haji Wakil.78 Master Sergeant Curtis C. Gregory, Company A’s operations chief, re- called a relative calm at that point, as flashes from the commandos’ infrared lights and weapons sights could be seen atop buildings in the bazaar79—good news for the Marines, who had been precluded from firing their weapons until they passed the British lines.80
Map by author
Captain Bitonti established a linear blocking position, facing west toward Bahram Chah. Lieutenant Michael D. Mitchell’s 2d platoon was located on the southern flank in a low-lying, vegetated area near the Pakistani border. The rest of the company was situated on higher ground, with headquarters in the middle and Second Lieutenant Wright’s 3d Platoon to the north.81
It was dark by the time 2d Platoon pulled into position. The enemy could hear, but not see the Marines’ armored vehicles. Before long, the Marines spotted enemy fighters maneuvering toward their position, ducking in and out of buildings and crawling through the brush. The insurgents operated individually, as pairs, and occasionally in teams of three or four. Most were armed with assault rifles, although some carried machine guns and RPGs. In one instance, Gunnery Sergeant Abrams’s crew killed a pair of fighters who had tried to fire an RPG at the Marines. When the enemy fell, another fighter picked up the RPG and tried to fire, but was also shot. Nearby, Lieutenant Mitchell’s crew similarly engaged a fighter armed with an RPG who was maneuvering through vegetation about 75 meters away. The Marines may have killed a suicide bomber—a man wearing a vest appeared to explode as he ran at their vehicle and was shot.82
The enemy maneuvered like well-trained and disciplined soldiers, yet they were obviously unfamiliar with the light armored vehicles’ capabilities.83 In addition to being well armed and impervious to small-arms fire, the vehicles had thermal imagery devices that allowed the crews to shoot accurately in the dark at up to 3,000 meters. According to Sergeant Sanford, the thermal imaging devices made night “as bright as day and so detailed you can determine what kind of weapon the enemy is carrying.”84 Gunnery Sergeant Abrams also acknowledged being able to see the enemy maneuvering through buildings and behind walls.85
After passing through British lines, Captain Haskamp established a second blocking position with Company B facing south along the north side of Haji Wakil. Second Platoon, under First Lieutenant Gabriel M. Lavine, was positioned on the left flank, with the company executive officer, First Lieutenant Charles L. Hostetler, and Headquarters Platoon in the middle. Third Platoon, under First Lieutenant Christopher M. Phifer, was on the right flank. Each platoon had to carefully observe their sectors of fire, because they were unable see Company A to the southeast. In addition to cordoning off the residential area, 3d Platoon was also positioned to cover the entrance to the western corridor.86
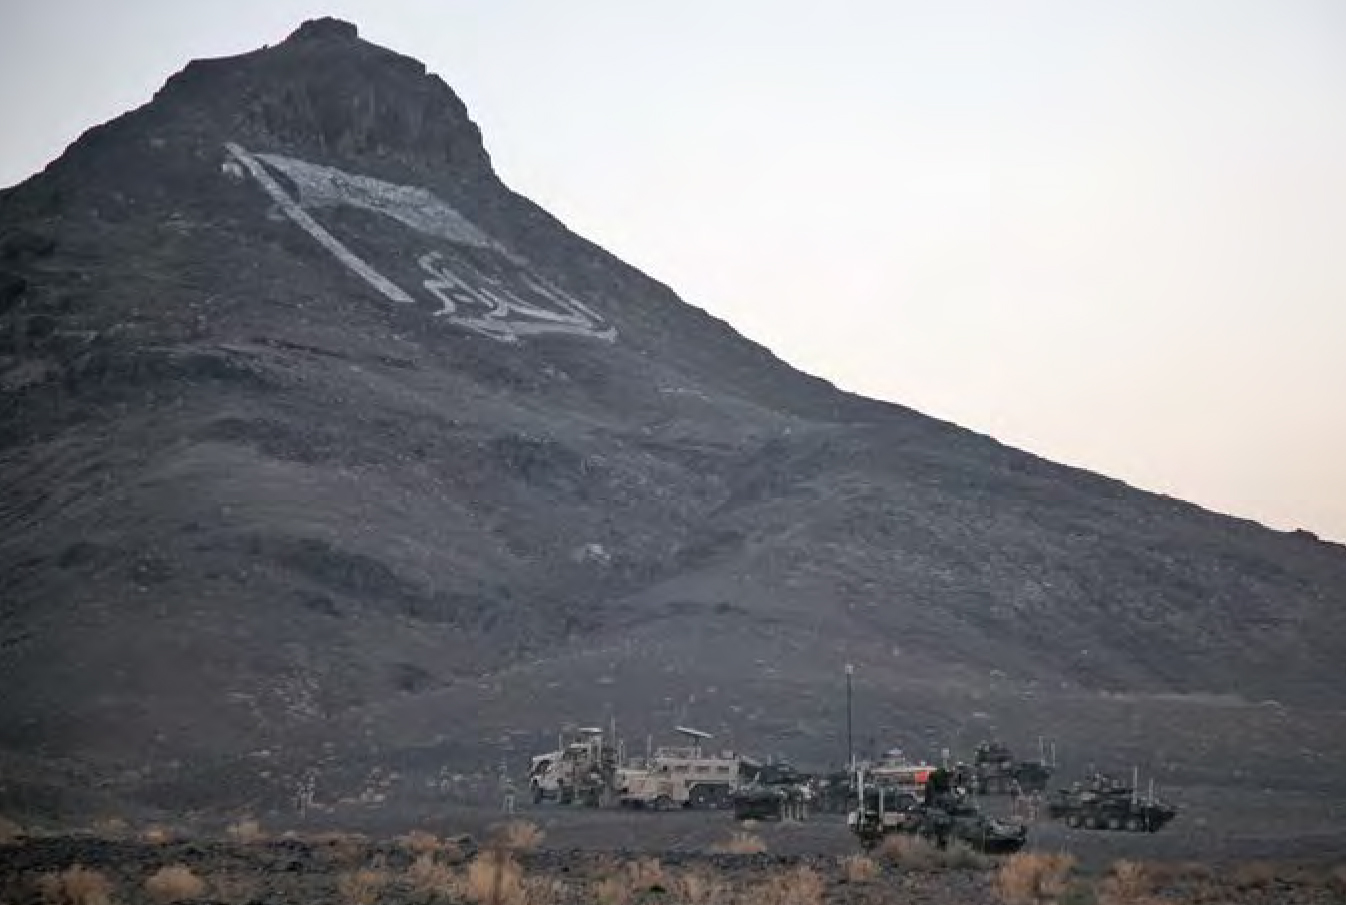
Task Force Highlander’s forward command center on the morning of its raid against Bahram Chah on 30 October 2010 was situated on the northern outskirts of the main residential area at the base of a hill in Afghanistan bearing an image of the Taliban flag. Defense Imagery 101030-M-1263P-011
Shortly after Company B passed the bazaar, a vehicle crew spotted and killed three fighters armed with RPGs. Once in position, other members of the company engaged small groups of fighters who were maneuvering among the buildings and through the bush. First Sergeant Jon D. Jerome, unimpressed by the enemy’s lack of situational awareness, was dumbfounded that they continued to use paths that the Marines covered with automatic weapons.87 Meanwhile, Lieutenant Colonel Leonard situated his jump command post on the edge of the objective area, north of the bend in the battalion’s L-shaped blocking position, about 800 meters from Haji Wakil.88 Major Custis established a multiuse point directly behind the objective area, which incorporated the casualty collection, maintenance collection, detainee transfer, and combined-operations coordination points for Task Forces Highlander and 210.89 Captain Rapkoch took control of all supporting fires and employed AC-130 gunships to disrupt the insurgents’ haphazard defenses.90 According to intelligence reports, little danger of civilian casualties existed because Taliban forces had driven them out the area, and the civilians had not returned before the Marines’ arrival.91 To prevent accusations of firing across the Pakistani border, Marines also used video to capture all weapons fires within the objective area.92
Taliban resistance decreased as dawn broke, although isolated individuals and locations were targeted throughout the day. In one instance, for example, Company B Marines observed an enemy spotter using a cell phone to direct 107mm rocket fire. Marines responded with a tube-launched, optically-tracked, wireless-guided (TOW) missile launched at the building in which the spotter was hiding.93
Task Force 210 cleared the bazaar—which measured approximately 400 meters by 700 meters and contained about 150 shops—in 12 hours. First Lieutenant Buck A. Bradley’s 1st Platoon detached from Company B upon entering the objective area and assisted the British by providing cover as the commandos maneuvered forward, suppressing enemy fighting positions and securing high-speed avenues of approach.94 The commandos moved systematically from west to east and examined each of the bazaar’s shops for indications that its occupants were contributing to the insurgency. If the search failed to find such evidence, the shop was left intact. If evidence of illicit activities was discovered (e.g., weapons, munitions, or bomb making or drug processing materials), the material was seized for further exploitation or destroyed on site.95 During the clearing operation, commandos killed a suicide bomber before he could detonate his explosives.96
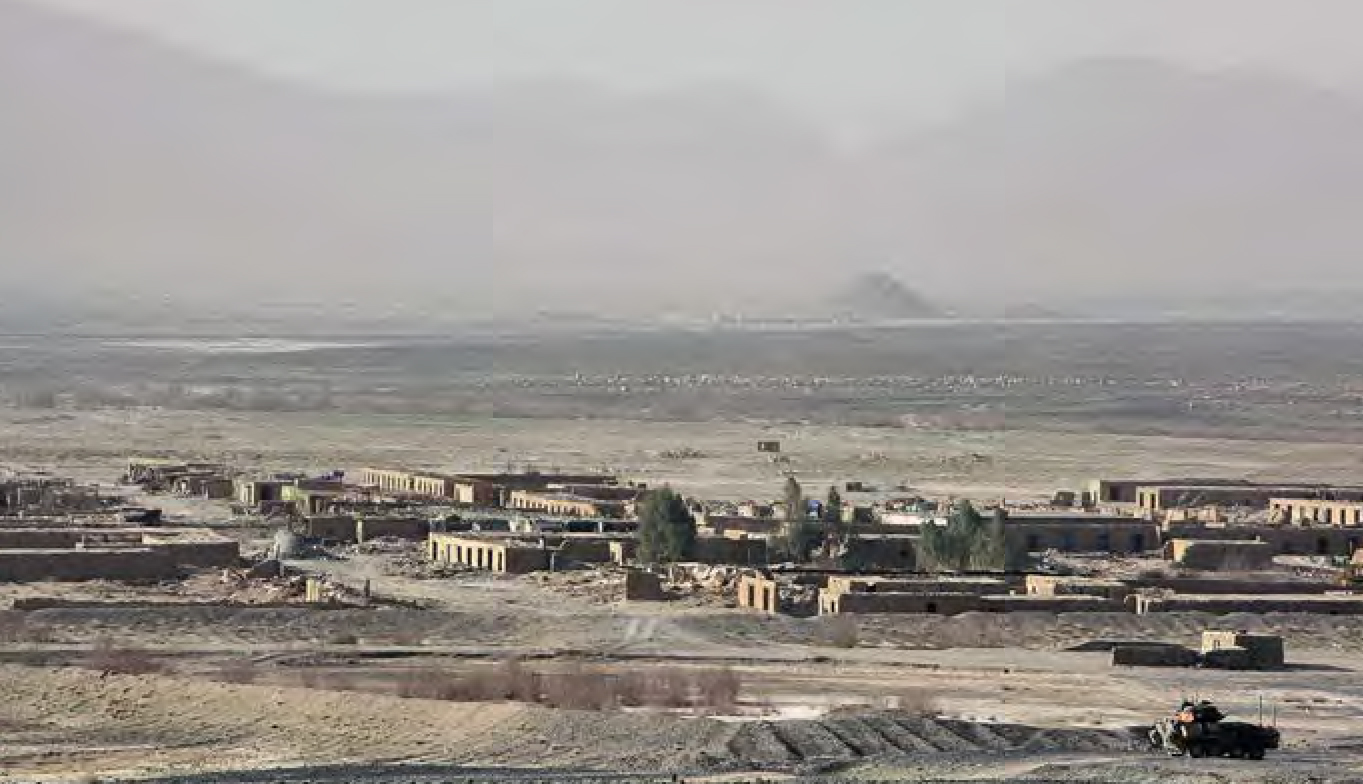
A 17 March 2011 photo shows the Bahram Chah bazaar, which facilitated the movement of enemy fighters, weapons, and ammunition into—and drugs out of—Afghanistan. Photo by SSgt Jeremy Ross, Defense Imagery 379620
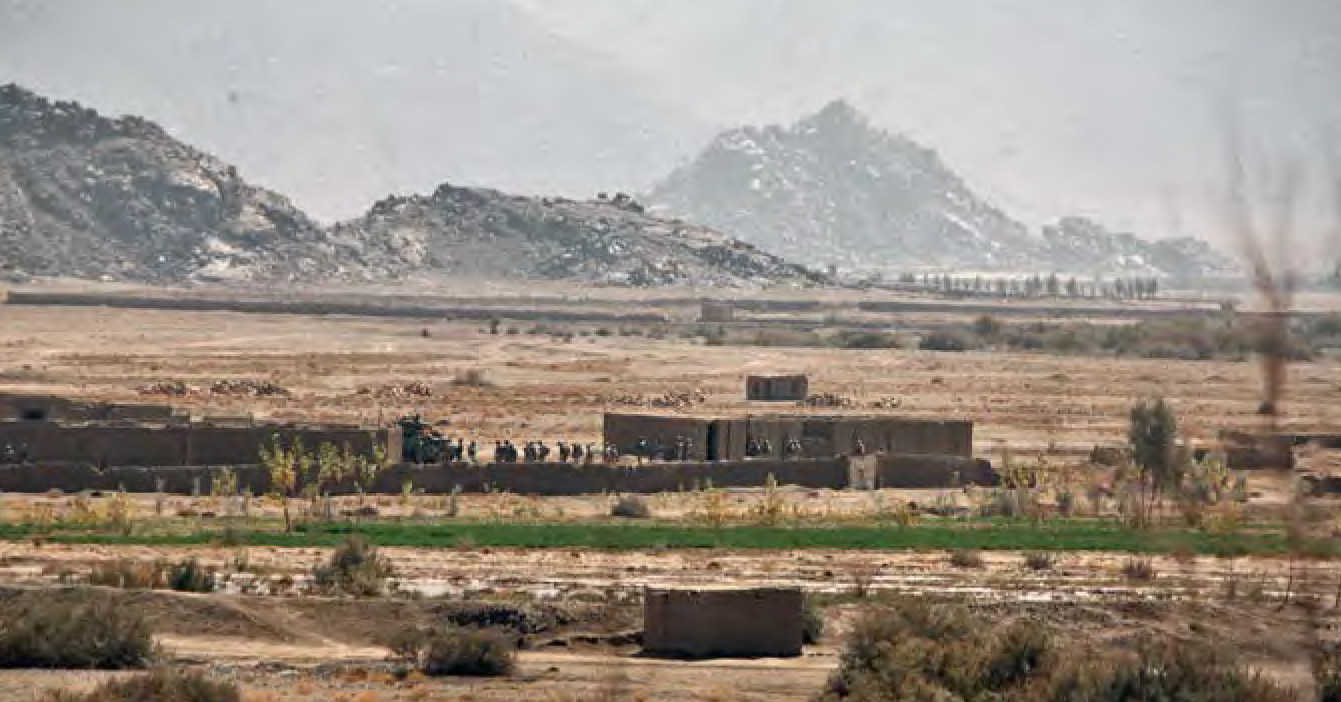
British special operating forces and Marines from Task Force Highlander search a compound at one end of the Bahram Chah bazaar on 30 October 2010. Defense Imagery 336189
Captain Bitonti and Master Sergeant Gregory coordinated the medical evacuation of two Afghan soldiers injured while clearing the bazaar. As the two Marines moved toward the bazaar to collect the wounded, a HIMARS rocket struck and destroyed a nearby building, but they were uninjured. One of the Afghan soldiers had been shot in the hip, and the other had twisted his ankle.97 After transporting the wounded to the multiuse point for treatment and evacuation, the Marines rejoined Company A.98
Tensions grew throughout the day as a crowd of unarmed men gathered on the Pakistani side of the border. The men moved about in groups of approximately 10–50 individuals and eventually totaled about 500 people.99 Gunnery Sergeant Abrams recalled that the men sat on the ground, under trees, on walls, or in compounds. They watched the Marines with casual disregard, as if they were certain of their safety and waiting patiently for the Coalition forces to leave.100 The prevailing opinion was that the men were Taliban reinforcements, assembled from villages throughout the region, preparing for a counter-attack that failed to materialize after the fatal morning defeat.101
Later that afternoon, the Marines were able to vent their frustrations over the growing crowd south of the border. A large hill mass north of the objective area overlooked Haji Wakil. On one slope, the enemy had inscribed “Taliban Pass” using white rocks. When A-10 aircraft destroyed the inscription with a 25mm cannon, Captain Bitonti likened the scene to “watching the eraser tool on [Microsoft] Paint.”102 The Marines cheered, but the Taliban were “livid, jumping around and slamming their fists on the ground.”103 Another slope held the image of the Taliban flag with an accompanying inscription; however, a friendly observation post was located nearby, and the site was left intact.
Later that afternoon, insurgent activity escalated, with occasional teams of two enemy fighters emerging from buildings to take potshots at the Marines. Once night fell, scattered engagements of growing intensity occurred across the Marines’ frontage.104 Originally, the combined task force was to remain in the objective area for a second day to clear Haji Wakil, but element leaders reckoned that the most important part of the mission was accomplished and that lingering any longer would tempt fate. The Coalition had suffered two casualties by that point, and the force had gone without sleep for 36 hours. Moreover, Haji Wakil was larger and more complex than the bazaar; the plan for Haji Wakil was not as well developed; and maintaining command and control would be difficult.105
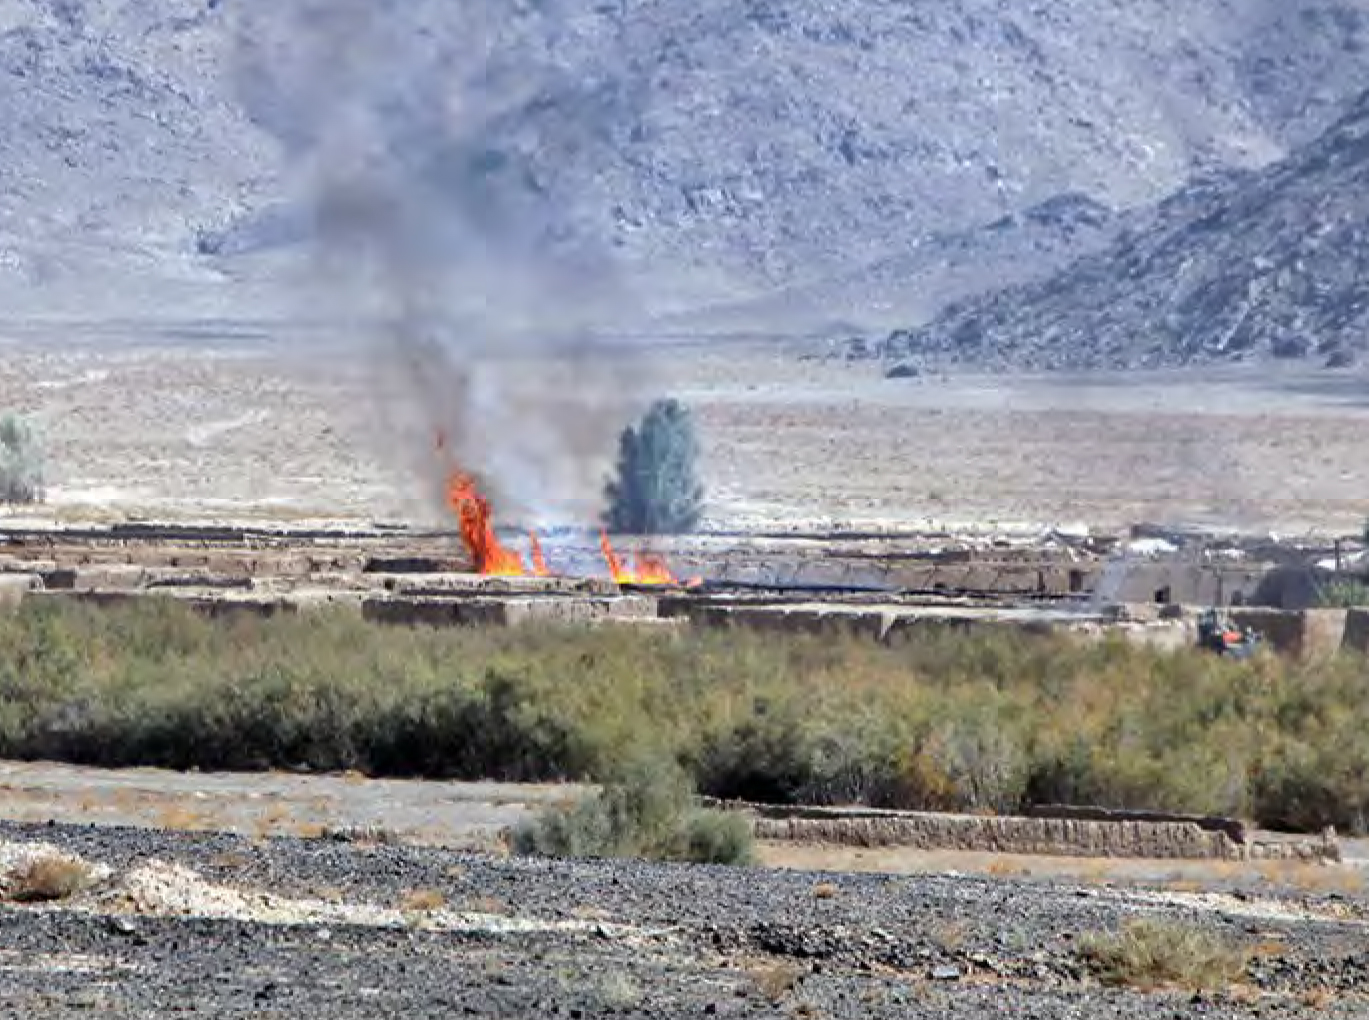
Flames and smoke rise from a damaged Taliban structure during Operation Steel Dawn II on 30 October 2010. Defense Imagery 336192
At the conclusion of the clearing operation, 1st Platoon, under Lieutenant Bradley, escorted Task Force 210 to an extraction point, located about four kilometers from the objective area.106 The Britsh were lifted out by helicopter around midnight. After confirmation of the commandos’ extraction, Task Force Highlander began its own move from Bahram Chah. Before leaving, however, the Marines destroyed the Taliban flag on the nearby hillside.107
Operation Steel Dawn II
|
|
In late October 2010, Coalition forces from Regional Command Southwest (RC-SW) raided the bazaar at Bahram Chah, which served as a Taliban logistics base along the southwestern border between Afghanistan and Pakistan. Task Force 210, a conglomerate of British and Afghan special operations forces, comprised the assault element. As the operation’s main effort, Task Force 210’s initial mission was to insert under the cover of darkness and seize the bazaar.
The 1st Light Armored Reconnaissance Battalion (1st LAR/Task Force Highlander) served as the security element. Its role was to conduct a simultaneous road march to Bahram Chah, to link up with Task Force 210 at sunrise, and then to secure the objective area by cordoning off villages to the northeast and southwest of the bazaar. This would enable Task Force 210 to focus on searching for contraband and intelligence rather than fighting off insurgents.
The support element was primarily drawn from other I Marine Expeditionary Force (I MEF) units. It included a platoon from 3d Combat Engineer Battalion, which accompanied Task Force Highlander and helped negate obstacles in the convoy’s path. A groupment of light howitzers and rocket artillery from 1st Battalion, 11th Marines, eliminated enemy fighting positions along the route and in the objective area. Marines from Combat Logistics Battalion 3’s Landing Support Platoon and Motor Transport Company B provided food, water, fuel, and ammunition as well as recovered and repaired damaged vehicles during the operation. Marine Wing Support Squadron 373 established a forward arming and refueling point. Operating from this location, pilots and aircrews from Marine Heavy Helicopter Squadron 466, Marine Medium Tiltroter Squadron 365, and Marine Light Attack Helicopter Squadron 369 provided logistical, medical evacuation, and close air support to the ground forces. Close air support included the Marine Fighter Attack Squadron 232, flying from the Kandahar International Airport, and U.S. Air Force Rockwell B-1 Lancer bombers, Fairchild Republic A-10 Thunderbolt attack bombers, and Lockheed AC-130 Spectre gunships. U.S. Army Sikorsky UH-60 Black Hawk helicopters were also on hand in case medical evacuations were required.
The raid was an unmitigated success and, according to Major General Richard P. Mills, commander of I MEF and RC-SW, it had a significant impact on the enemy’s warfighting ability. In addition to killing between 15 and 25 insurgents, Coalition forces seized nearly 27 metric tons of ammonium nitrate, 60 cases of .50-caliber machine gun ammunition, 22 IEDs, and numerous artillery shells, automatic weapons, and assorted ammunition, as well as 40 kilograms of opium, 500 liters of acid, and 2,000 kilograms of precursor chemicals used to refine narcotics. No Marines were injured during the operation.
|
Task Force Highlander returned along the same route it had used to enter. The convoy departed by echelon, in reverse order of its arrival, while the cannon platoon covered its withdrawal with smoke rounds.108 The only thing slowing the Marines’ exit was the recovery of abandoned, inoperable armored vehicles from a platoon that had guarded the corridor during the raid.109
The convoy reached the LSA around 0500 hours on 31 October. Companies A and B quickly established a southward facing screen in front of the assembly area.110 While unit leaders participated in an operational debriefing, the Marines attended to their vehicles, weapons, equipment, and personal gear, but also found time to get much needed rest. The following morning, Task Force Highlander began to collapse the LSA. Over the next two days, the support and then the assault elements returned to their home stations.111
The raid on Bahram Chah was considered an unmitigated success. While no Marines had been injured, official press releases reported that Coalition forces had killed between 15 and 25 insurgents. Reports also acknowledged that those numbers did not include dead or wounded fighters that the enemy might have retrieved during the prolonged action.112 Other sources, which did account for those losses, estimated that the number of enemy dead might have been more than 70.113 In addition to seizing nearly 27 metric tons of ammonium nitrate—enough to arm 2,000 IEDs—the raid force also recovered 60 cases of .50-caliber machine-gun ammunition, 22 IEDs, and numerous artillery shells, automatic weapons, and assorted ammunition. Drug-related materials confiscated included 40 kilograms of opium, 500 liters of acid, and 2,000 kilograms of precursor chemicals used to refine narcotics.114
In November 2010, 3d LAR, under Lieutenant Colonel Kenneth R. Kassner, relieved Task Force Highlander. As Lieutenant Colonel Leonard had prophesized, Coalition forces returned to Bahram Chah in March 2011. The 3d LAR spent three days in the infamous border town during Operation RawhideII. The Marines destroyed the bazaar, killed about 50 insurgents, and sustained minimal casualties.115
At the end of March 2011, Major General Mills turned command of RC-SW over to Major General John A. Toolan. After returning to the United States, Mills described Coalition efforts to deny sanctuary to the enemy and to “fight him on ground of our choosing” as having a “significant impact.”116
In a series of fairly aggressive movements up around the Sangin area and south against the border in Bahram Chah, we kept pressure on his lines of supply, kept pressure on his forces as they really tried to move to find areas to rest and relax in. We had some significant gains againsthim in that way and began to see some of his forces begin to crumble. As the supply lines were cut, we got excellent intelligence that showed us it was impacting him in the fighting holes. He was running out of money. He was running out of equipment, he was running out of ammunition. We saw that in things like him digging up old IEDs to attempt to reuse them on the battlefield. Things he would not have done had he had a warehouse full of them sitting somewhere. We saw him saving his expend- ed ammunition in order to repack his rounds. Things like that showed that he was having supply difficulties. We had very good intel that showed his subordinate commanders were also selling personal equipment, such as cars in order to pay their troops. Again, something he would not have done had he had access to the resources that he had at one point in time. So I think the pressure on him, the constant pressure, and the ability to fight him on ground of our choosing had a significant impact on his success.117
Epilogue
Despite those gains, Bahram Chah continued to serve as a Taliban logistics center in southwestern Afghanistan. One factor contributing to the site’s staying power was the enemy’s ability to seek sanctuary in nearby Pakistan. Major General Toolan lamented, “it’s like I can’t shut the water off, I just keep mopping up the floor. If I could turn the water off in Pakistan, it would be a lot better.”118 The Pakistani Army’s XII Corps was of little help on the southern side of the border because its government was preoccupied with a separatist movement in Balochistan, Pakistan.
Another factor was the aggressive withdrawal of American forces from Afghanistan, which began in July 2011 and then accelerated in 2012.119 As strategic priorities shifted, Task Force Leatherneck focused on training, advising, and turning operating areas over to Afghan security forces.120 Major General Charles M. Gurganus, who followed Major General Toolan as commander of RC-SW, defined success during his tenure “as setting the conditions for the Afghans to take over their own security, their own government, and then they have an opportunity to decide what to do with it.”121 Afghani Lieutenant Colonel Mohammad Rasul Qandahari, who commanded an Afghanistan Border Police battalion situated along the southern Helmand River, conceded that he and his men would need more manpower and larger weapons before they could hope to push southward into enemy territory.122
• 1775 •
Endnotes
- Associated Press, “Rumsfeld Declares Major Combat Over in Afghanistan,” Fox News, 1 May 2003.
- Thomas H. Johnson and M. Chris Mason, “Understanding the Taliban and Insurgency in Afghanistan,” Orbis 51, no. 1 (Winter 2007): 72, 81–82, 84.
- Jeffrey A. Dressler, Securing Helmand: Understanding and Responding to the Enemy, Afghanistan Report 2 (Washington, DC: Institute for the Study of War, 2009), 7, 33–34.
- Ann Scott Tyson, “Marines’ Afghanistan Plan Sparks Debate,” Washington Post, 12 October 2007, A-14.
- ISAF Joint Command-Afghanistan, “Regional Command Southwest Stands Up in Afghanistan,” Resolute Support News, 14 June 2010.
- Dressler, Securing Helmand, 13; I MEF Navy Unit Commendation recommendation, 26 July 2012 (Military Awards Branch [MilAwdsBr], Headquarters Marine Corps [HQMC], Quantico, VA); and Sgt Stuart R. Sanford intvw with Maj Beth Wolney, 8 February 2011 (Oral History Collection [Oral HistColl]). All oral history materials cited in this work can be found at the Gray Research Center (GRC), Quantico, VA.
- MajGen Richard P. Mills intvw with Dr. Kimberly Kagan, 2 May 2011 (Oral HistColl).
- “Largest Drugs Bazaar Raided,” PakTribune, 31 May 2005, http://paktribune.com/news/Largest-Drugs-Bazaar-raided-107625.html; and Waheed, “Afghan Forces Destroy Country’s Largest Drug Bazaar,” Afghan Warrior (blog), 5 June 2005, http://afghanwarrior.blogspot.com/2005/06/afghan-forces-destroy-countrys-largest.html.
- Ron Synovitz, “Afghanistan: Police Chief Says Smugglers Helped Taliban with Ambush,” Radio Free Europe/Radio Liberty, 11 October 2005, www.rferl.org/content/article/1062020.
- “Afghanistan Raids Drug Bazaar Near Pakistan Border,” Voice of America News, 11 April 2006; Daniel Cooney, “U.S. Warns Afghanistan Violence Will Worsen,” ABC News, 3 April 2006; and Reuters, “Afghans Seize Four Tonnes of Drugs, Arrest Seven,” Afghanistan News Center, 12 April 2006, http://www.afghanistannewscenter.com/news/2006/april/apr122006.html.
- “Special Boat Service Operations—Hunting Mullah Dadullah,” Elite UK Forces, 12 May 2007, http://www.eliteukforces.info/special-boat-service/operations/mullahdadullah/.
- “Seventy Taliban Said Killed in Afghanistan,” Reuters, 15 October 2008; “Up to 70 Taliban Killed in Afghan Strike: Local Official,” Agence France-Presse, 15 October 2008; and “70 Taliban Killed in Afghan Strike,” Daily Times, 16 October 2008, http://archives.dailytimes.com.pk/national/16-Oct-2008/70-taliban-killed-in-afghan-strike.
- Sebastian Abbot, “Taliban Sneak Past Marines in Southern Afghanistan,” Associated Press, 16 December 2009.
- Maj John R. Bitonti II intvw with Col N. S. Lowrey, 7 February 2011 (Oral HistColl); Maj John R. Bitonti II award, 2 December 2010 (MilAwdsBr, HQMC, Quantico, VA); and Sgt Dean Davis, “Charlie Company Marines Travel Far and Wide to Reach Afghan Locals,” Marine Corps News, 4 June 2010.
- Capt Adrian B. Hascamp intvw with Col N. S. Lowrey, 7 February 2011 (Oral HistColl); LtCol Scott D. Leonard intvw with Col N. S. Lowrey, 8 February 2011 (Oral HistColl); Capt Adrian B. Hascamp award recommendation, 2 December 2010 (MilAwdsBr, HQMC, Quantico, VA); and LtCol Scott D. Leonard award recommendation, 6 June 2011 (MilAwdsBr, HQMC, Quantico, VA).
- ISAF Joint Command Headquarters, “Joint Patrol Discovers 725 kg of Hashish,” 22 March 2010.
- “June 2 Airpower Summary: KC-135s Provide Fuel Support,” U.S. Air Force News, 4 June 2010.
- Thomas Harding, “Special Forces Commando Took on Taliban Single-handedly,” Telegraph, 24 May 2011.
- Ibid.
- ISAF Joint Command Headquarters, “IED Factory, Materials Destroyed in Southern Helmand,” 21 September 2010.
- Marine Medium Tiltrotor Squadron 365 (VMM-365) Command Chronology, hereafter ComdC, October 2010 (GRC, Quantico, VA), Part 2, 3.
- Leonard intvw.
- 1stLt Thomas F. Clauss III intvw with Col N. S. Lowrey, 7 February 2011 (Oral HistColl); and Capt Nicholas S. Rapkoch intvw with LtCol R. S. Sellards, 7 February 2011 (Oral HistColl).
- Capt Nicolas S. Rapkoch award recommendation, 27 December 2010 (MilAwdsBr, HQMC, Quantico, VA).
- Leonard intvw.
- Ibid.
- Rapkoch intvw.
- 1st MarDiv ComdC, 16 October—15 November 2010 (MCHC, Quantico, VA) Section 2, Fires; and Rapkoch intvw.
- 1st MarDiv, Task Force Leatherneck After Action Report for Operation Enduring Freedom 10.1–11.1, 24 February 2011 (GRC, Archives, Quan- tico, VA), 68.
- LtCol Adolfo Garcia Jr. intvw with Col N. S. Lowrey, 9 February 2011 (Oral HistColl).
- 1st Battalion, 11th Marines ComdC, 1 May—21 November 2010 (Marine Corps Heritage Center [MCHC], Quantico, VA) Part 2, 6–44; LtCol Adolfo Garcia Jr. comments on draft ms, 10 March 2015 (MCHC, Quantico, VA); and Garcia intvw.
- Maj David J. Grabow award recommendation, 14 February 2011 (MilAwdsBr, HQMC, Quantico, VA); and 1st Battalion, 11th Marines ComdC, 35–39.
- Ibid., 38.
- Garcia intvw.
- Bitonti intvw; and LCpl Adam B. Ramirez intvw with Col N. S. Lowrey, 8 February 2011 (Oral HistColl).
- Garcia intvw; and 1st Battalion, 11th Marines ComdC, 23, 25.
- Leonard intvw.
- Garcia comments on draft ms.
- Bitonti intvw; and GySgt Aaron J. Abrams intvw with Col N. S. Lowrey, 8 February 2011 (Oral HistColl).
- 1st MarDiv ComdC, Part 2, Fires.
- Abrams intvw; and GySgt Aaron J. Abrams award recommendation, 2 December 2010 (MilAwdsBr, HQMC, Quantico, VA).
- Maj Jon A. Custis award recommendation, 15 March 2011 (MilAwdsBr, HQMC, Quantico, VA).
- Cpl Derek B. Carlson, “Afghan, Coalition Forces Kill Insurgents; Seize Drugs, Weapons during Raid,” Marine Corps News, 1 November 2010, http://www.3rdmaw.marines.mil/News/NewsArticleDisplay/tabid/8112/Article/548747/afghan-coalition-forces-kill-insurgents-seize-drugs-weapons-during-raid.aspx.
- Leonard intvw; and Maj Jon A. Custis intvw with Maj Beth Wolney, 7 February 2011 (Oral HistColl).
- Cpl Paul D. Zellner, “Wrecker Crew Keeps Convoy Rolling during Operation Steel Dawn II,” Defense Imagery, 13 November 2010.
- 1st Battalion, 11th Marines ComdC, 13, 23; and Garcia intvw.
- Cpl Paul D. Zellner, “Marines Provide Logistics Support to Coalition Forces during Operation Steel Dawn II,” Defense Imagery, 11 November 2010.
- Leonard intvw.
- Carlson, “Afghan, Coalition Forces Kill Insurgents.”\
- See image courtesy of Defense Imagery (337483) that accompanies Carlson, “Afghan, Coalition Forces Kill Insurgents”; and VMM-365 ComdC, 3.
- Carlson, “Afghan, Coalition Forces Kill Insurgents.”
- Abrams intvw; and Abrams award. On 23 and 26 October 2010, Task Force Leatherneck executed dynamic strikes against compounds associated with the production of IEDs, destroying buildings and their contents, according to the 1st MarDiv ComdC.
- Rapkoch intvw; and Abrams intvw.
- Ibid.
- Clauss intvw; and MSgt Curtis C. Gregory intvw with Col N. S. Lowrey, 8 February 2011 (Oral HistColl).
- Rapkoch intvw; and Ramirez intvw.
- Ibid.
- Gregory intvw; and Custis award.
- Maj David J. Grabow intvw with LtCol R. S. Sellards, 9 February 2011 (Oral HistColl); Garcia intvw; and Grabow award.
- Leonard intvw; and Mills intvw.
- Abrams intvw.
- Rapkoch intvw; Clauss intvw; Abrams intvw; and Rapkoch award.
- Ibid.; and Rapkoch intvw.
- 1st Battalion, 11th Marines ComdC, 25; Rapkoch award; and Rapkoch intvw.
- Rapkoch award; Garcia intvw; and Leonard intvw.
- 1st Battalion, 11th Marines ComdC, 36.
- Rapkoch intvw.
- Ramirez intvw.
- Sanford intvw.
- Mills intvw.
- 1stLt Michael D. Wright award recommendation, 2 December 2010 (MilAwdsBr, HQMC, Quantico, VA).
- Leonard intvw; Bitonti intvw; Gregory intvw; and Rapkoch intvw.
- Ibid.; Clauss intvw; Abrams intvw; Garcia intvw; and 1st Battalion, 11th Marines ComdC, 39.
- Bitonti intvw; and Rapkoch intvw.
- Mills intvw.
- Bitonti intvw; and 1stLt Jonathan R. Walaski award recommendation, 2 February 2011 (MilAwdsBr, HQMC, Quantico, VA).
- Ibid.
- Bitonti intvw.
- Gregory intvw.
- Abrams intvw.
- Bitonti intvw; Gregory intvw; and Abrams intvw.
- Ibid.
- Bitonti intvw.
- Sanford intvw.
- Abrams intvw.
- Sanford intvw; 1stSgt Jon D. Jerome intvw with LtCol R. S. Sellards, 7 February 2011 (Oral HistColl); and 1stSgt Jon D. Jerome phone conversation with author.
- Jerome intvw.
- Leonard award; Rapkoch intvw; and Jerome phone conversation.
- Custis award.
- Rapkoch award; and Rapkoch intvw.
- Jerome intvw.
- Grabow intvw.
- Jerome intvw.
- 1stLt Buck A. Bradley award recommendation, 23 November 2010 (MilAwdsBr, HQMC, Quantico, VA).
- MajGen Richard P. Mills, “Major General Richard Mills on Afghanistan” (lecture, Carnegie Endowment for International Peace, Washington, DC, 27 April 2011), http://carnegieendowment.org/2011/04/27/major-general-richard-mills-on-afghanistan/49q.
- Clauss intvw; Rapkoch intvw; and Leonard intvw.
- Clauss intvw; Rapkoch intvw; and Leonard intvw.
- Gregory intvw; and Clauss intvw.
- Bitonti intvw; and Abrams intvw.
- Ibid.
- Bitonti intvw; and Leonard intvw.
- Bitonti intvw.
- Ibid.
- Abrams intvw; and Gregory intvw.
- Rapkoch intvw.
- Bradley award.
- Bitonti intvw.
- Clauss intvw; and 1st Battalion, 11th Marines ComdC, 36.
- Rapkoch intvw; and Abrams intvw.
- Clauss intvw.
- Leonard intvw.
- U.S. Department of Defense, “Officials in Afghanistan Provide Details of Operations,” DOD News, 1 June 2010; and ISAF IJC Headquarters, “Afghan, Coalition Forces Wrap Up Helmand Clearing Operation,” DOD News, 8 November 2010.
- Leonard award.
- Carlson, “Afghan, Coalition Forces Kill Insurgents.”
- Sgt Jeremy Ross, “3rd LAR Strikes Key Insurgent Border Hub during Operation Raw Hide II,” II MEF Marine Expeditionary Force, 19 March 2011, http://www.iimef.marines.mil/News/NewsArticle/tabid/472/Article/529363/3rd-lar-strikes-key-insurgent-border-hub-during-operation- raw-hide-ii.aspx.
- Mills intvw.
- Ibid.
- Jim Garamone, “Pakistan, Corruption Affect South, West Afghanistan,” American Forces Press Service, 24 April 2012.
- CNN Wire Staff, “Afghan Withdrawal More ‘Aggressive’ than Military Proposed,” CNN News, 24 June 2011, http://www.cnn.com/2011/ POLITICS/06/23/afghanistan.troops.drawdown/; Chris Carroll, “As Marines Leave Helmand, Focus Turns to Training Those Left Behind,” Stars and Stripes, 11 July 2012, http://www.stripes.com/news/as-marines-leave-helmand-focus-turns-to-training-those-left-behind-1.182699; and Dan Lamothe, “Taliban Make Gains as Marines Take Backseat,” Marine Corps Times, 29 October 2012, http://archive.marinecorpstimes.com/article/20121029/NEWS/210290319/Taliban-make-gains-Marines-take-backseat.
- Robert Burns, “Afghanistan: Marines to Wind Down Combat in 2012,” Huffington Post, 26 November 2011, http://www.huffingtonpost.com/2011/11/26/afghanistanmarines-2012_n_1114239.html.
- Dan Lamothe, “Marine General: Lethal Aid Entering Helmand Is Top Concern,” Military Times, 18 April 2013, http://archive.militarytimes.com/article/20130418/news/304180025/Marine-general-Lethal-entering-helmand-top-concern.
- Ibid.