Marine Corps University Communications Style Guide
APPENDIX B: FORMATTING AND PAGE DESIGN
Formatting and page design refers to the way the text is arranged on the page and includes specifications for font, spacing, use of visuals, and the ordering of elements in the paper. This appendix provides guidelines for formatting MCU academic assignments; additionally, it contains several Microsoft Word tutorials that show you how to locate the specific functions that will allow you to properly format your document. All guidelines presented are adapted from The Chicago Manual of Style, 17th edition.
CSG B.1 Document Setup and Microsoft Word Formatting
CSG B.1.1 Font
Though The Chicago Manual of Style does not make any specific recommendations regarding the type of font documents should use, as font may vary based on the type of document you are writing. The assignments you produce at MCU will typically use Times New Roman, 12-point font unless otherwise specified. Be aware, however, that many of the papers you write using military formats (e.g., point papers, position papers, and official correspondence) will use Courier New.
CSG B.1.2 Spacing
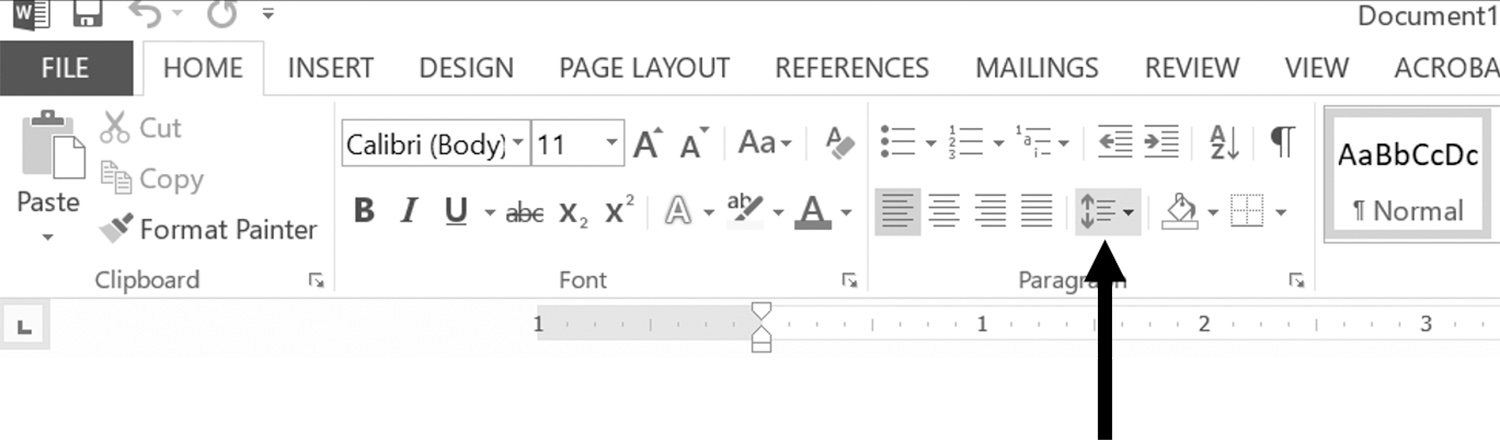
The Chicago Manual of Style specifies that texts should always be double-spaced when sent for publication review, as this allows editors to make comments between lines of text. The assignments you submit to your faculty members at MCU should be double-spaced to allow for instructor feedback. This includes your bibliography page, though CMOS also allows single spacing for the bibliography with double spacing in between entries. Table 42 provides directions for changing the spacing in your document in Microsoft Word.
Table 42. How to adjust line spacing
|
Step
|
Visual
|
|
Click on the line spacing icon on the toolbar.
|
|
|
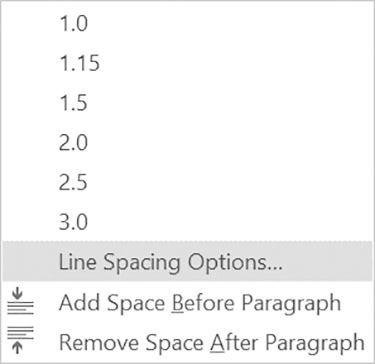
Select Line Spacing Options from the dropdown menu.
|
|
|
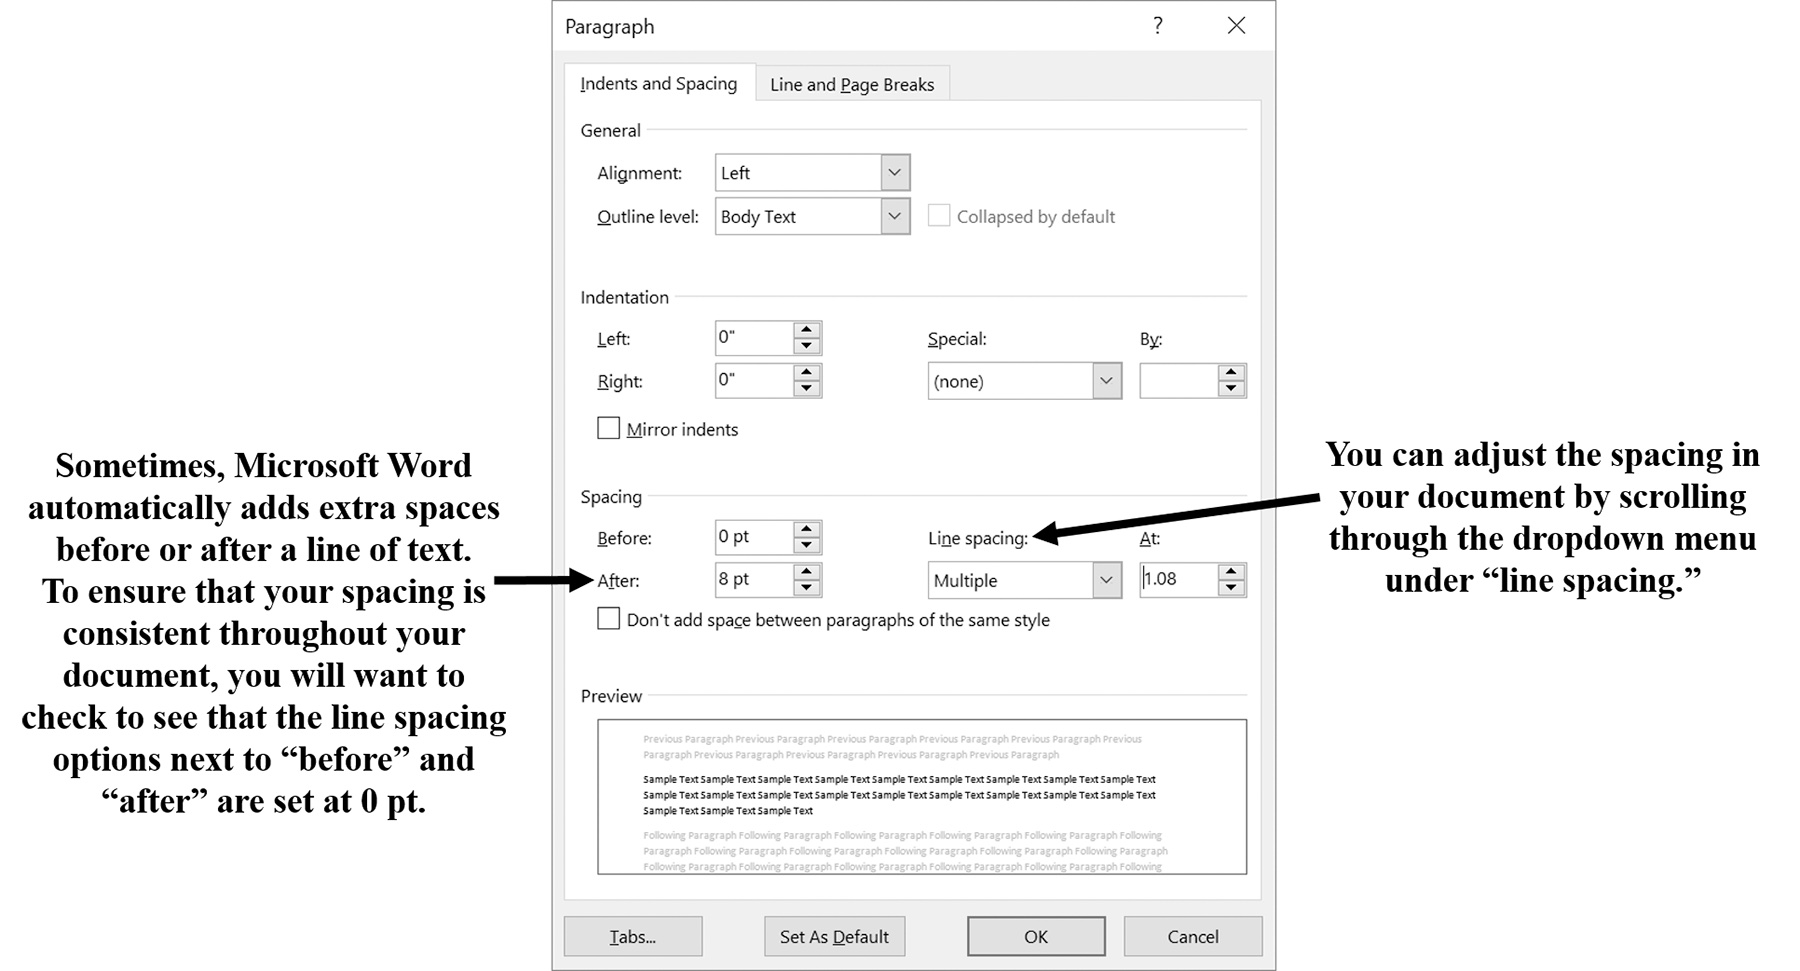
When you click on Line Spacing Options, you should see this menu.
|
|
It is also important to use correct spacing when separating sentences and clauses. The Chicago Manual of Style recommends using only one space after a period or colon, though you may find your supervisor or faculty advisor has a different preference (e.g., the military frequently uses two spaces after the period and one space after a colon).
CSG B.1.3 Justification and Margins
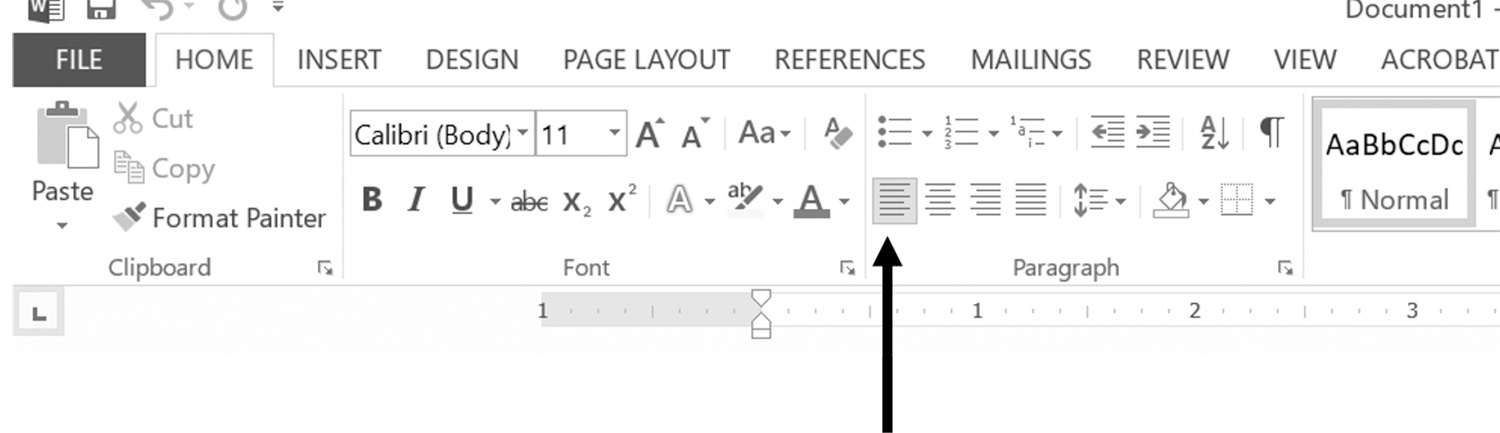
All text should be flush left. The text should not be justified. Table 43 shows you how to adjust the text alignment of your document.
Table 43. Text alignment
|
Click on the box marked
by the arrow to align your text correctly.
|
|
CSG B.1.4 Page Numbering
The Chicago Manual of Style recommends placing page numbers at the top of the page with page numbers alternating on the left and right sides. This is mainly aimed at the publication of books where you would want the page numbers to appear on both outside corners of the text. When writing an academic paper for Marine Corps University or another PME institution, consult individual faculty members to determine their preference for page numbering. The title page (which is typically the first page of the text), for example, is not typically numbered in either books or academic papers. If the text contains front matter, then the front matter should be numbered using lowercase Roman numerals (e.g., i, ii, and iii). The pages in the main text and back matter should use Arabic numerals (e.g., 1, 2, and 3). Table 44 provides guidance for formatting page numbers in Microsoft Word.
Table 44. Formatting page numbers
|
Step
|
Visual
|
|
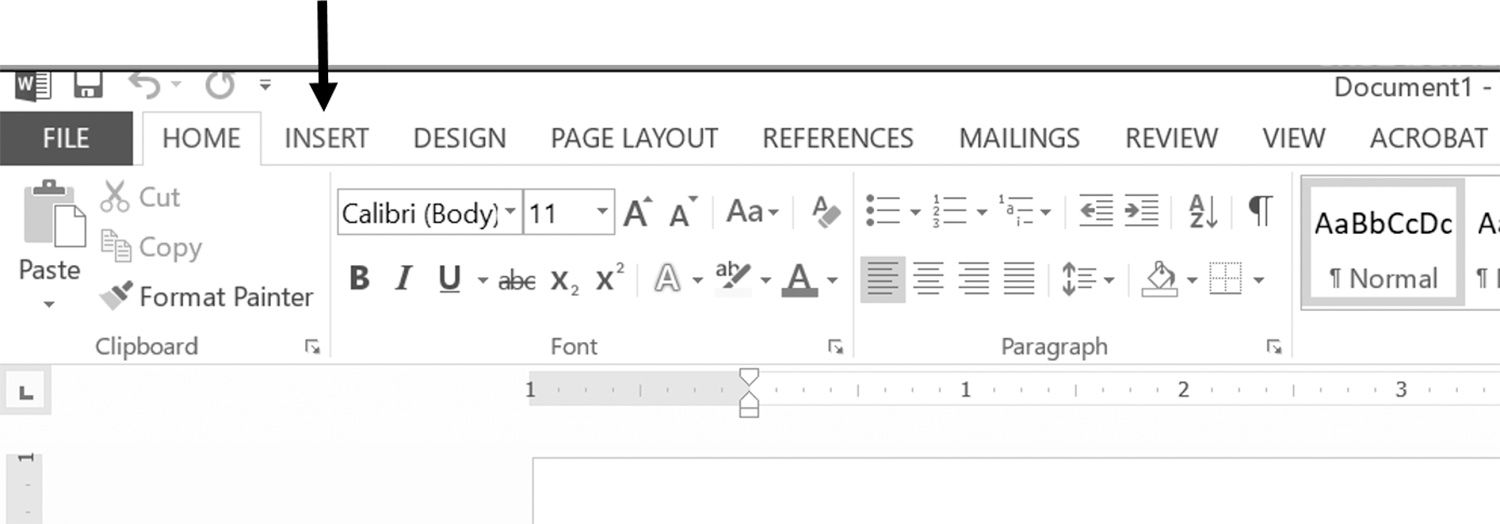
Click Insert on the toolbar.
|
|
|
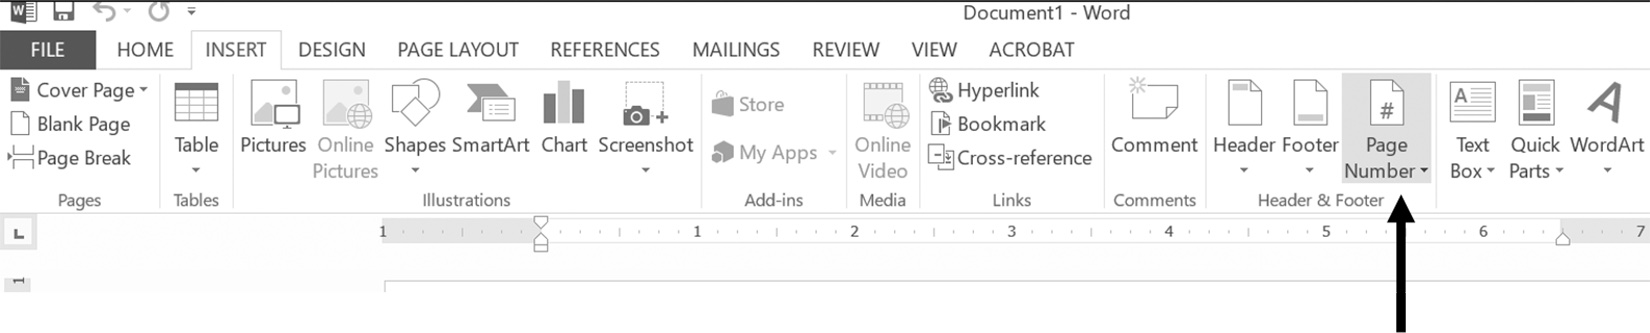
Click Page Number.
|
|
|
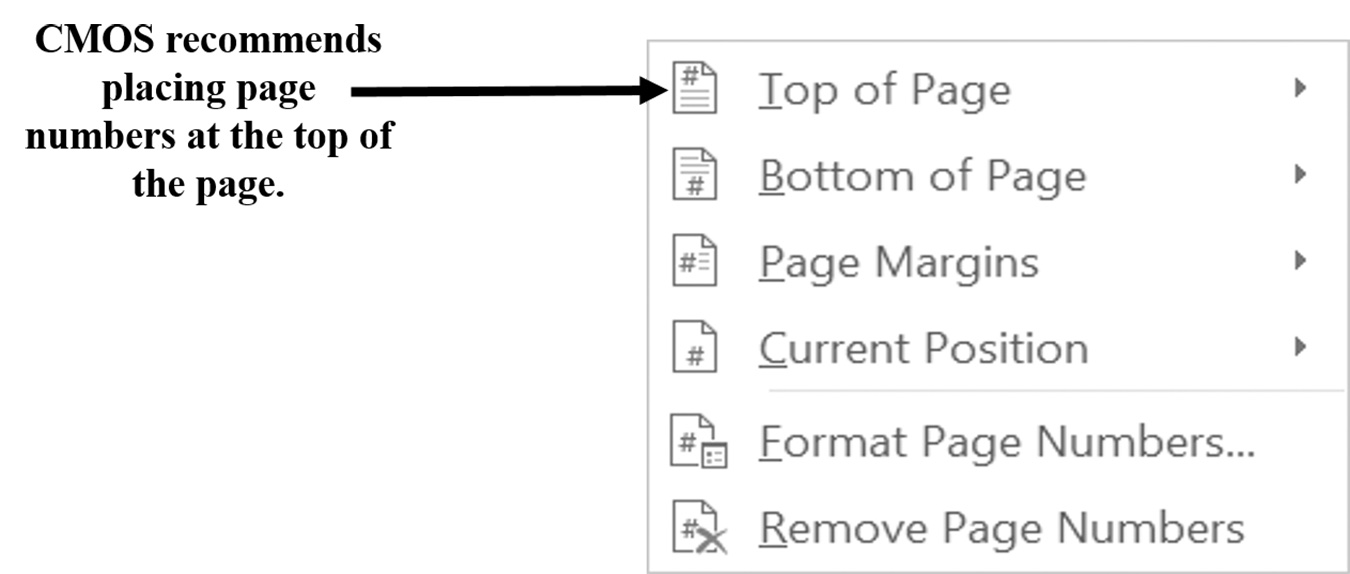
When you click on Page Number, you will
see several options that will allow you to
place the page number at various places
on the page. You will want to select
Top of Page unless your faculty member
or the publication you are writing for has instructed otherwise.
|
|
|
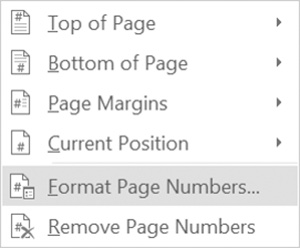
To change the numbers
on the page from Arabic
numerals to Roman
numerals or vice versa,
select Format Page
Numbers from the dropdown menu.
|
|
|
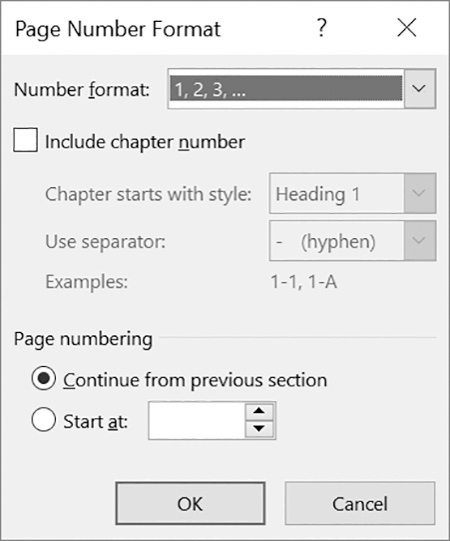
This will bring you to the Page Number Format menu. Use the dropdown menu
next to number format to choose the
numbering system you wish to use
throughout the document.
|
|
Take note that the pages in the front matter should be numbered with lowercase Roman numerals (i.e., i, ii, and iii) as opposed to Arabic numerals (i.e., 1, 2, and 3), which should be used in the main text. To use two sets of numbering in the same document, you will need to create a section break. Table 45 provides more information about creating section breaks to allow for two systems of numbering within the same document. Table 46 depicts information on how to use Microsoft Word tools to automatically insert an endnote into your paper.
Table 45. Creating a section break to separate the front matter from the main text
|
Step
|
Visual
|
|
Go to the last page of the
front matter and click on
Page Layout on the top toolbar.
|

|
|
Click on Breaks, located
in the second box on the top toolbar.
|

|
|
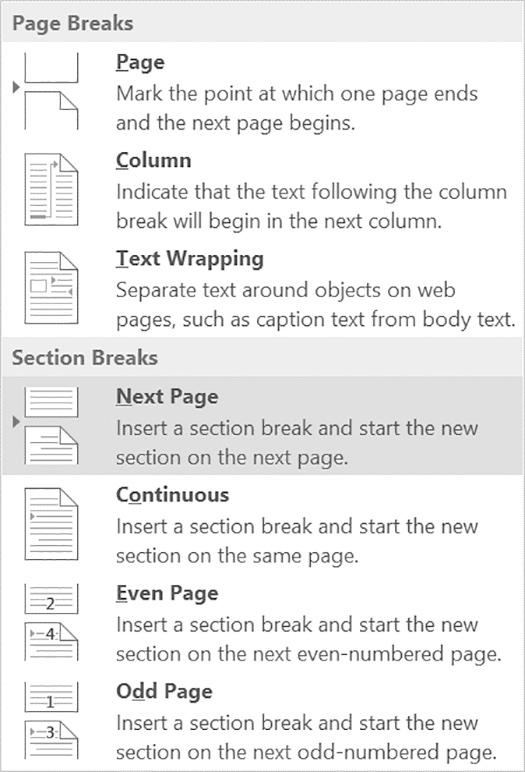
From there, a box will drop
down and you have many options.
Click on Next Page; it is the first option under section breaks.
Your curser will automatically
be placed at the header of
the second page, although nothing
will pop up.
|
|
|
To make changes, double click
on the place where your cursor
has been positioned. It should
look like the visual here.
Note: there are two sections.
Both the header and footer
must be shown for the necessary
changes to be made.
|

|
|
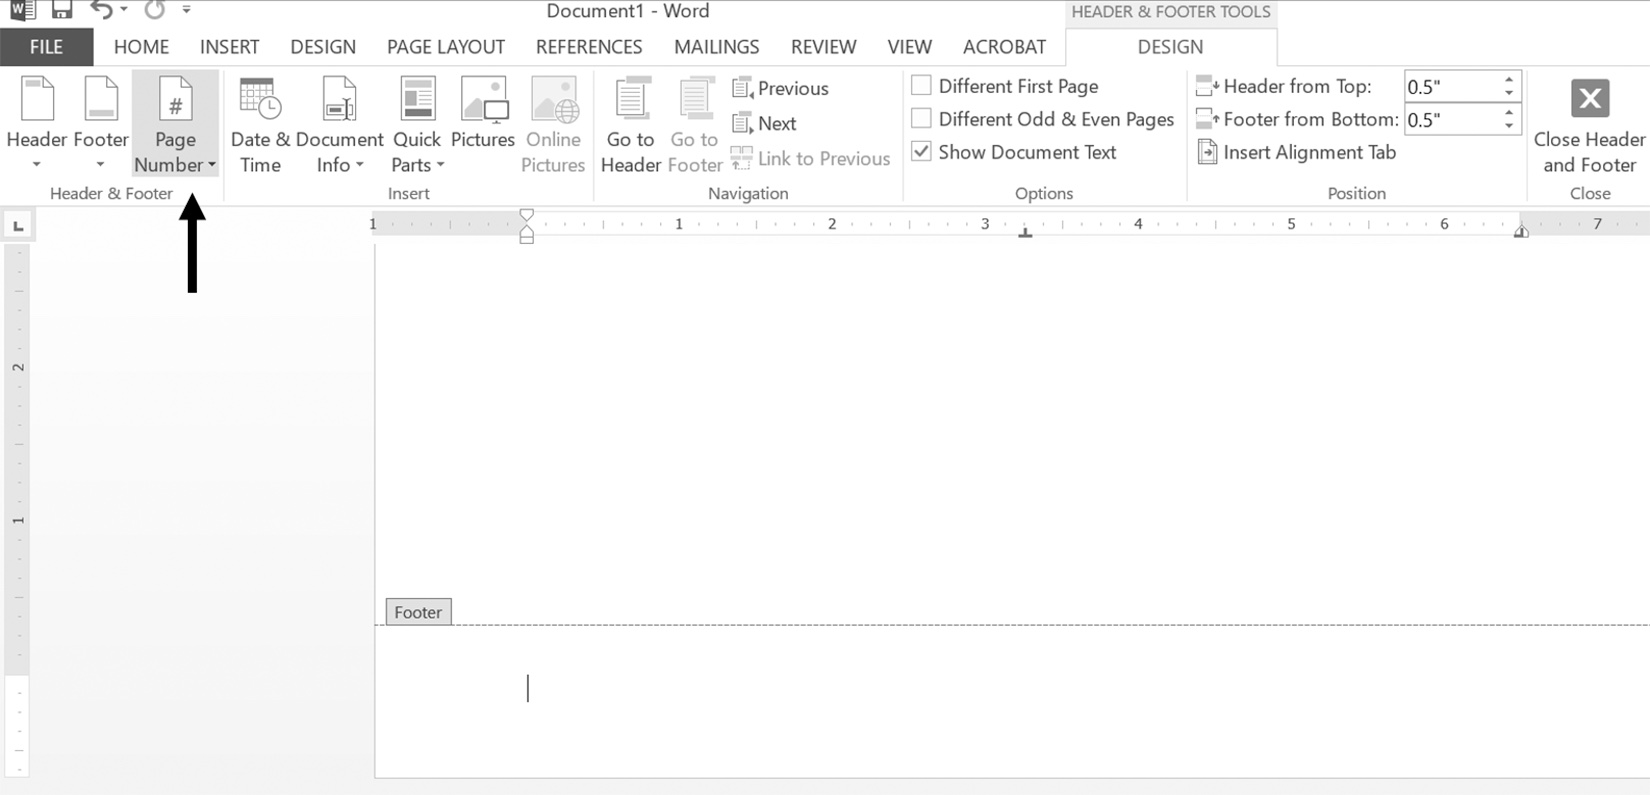
Click on Page Number, located
in the first box on the top toolbar.
|
|
|
A drop screen should be displayed.
Click on bottom of the page for the
first section’s page number.
|
 |
|
After the page number appears
on the bottom of the screen, click
on Page Number again, and when
the drop screen is displayed, click
on format page numbers. A screen
like this should appear. In the page
number format box, at the top is a
drop menu titled Number Format.
Click on the arrow, and a number
of choices will be displayed. You
can choose Arabic numerals or
Roman numerals, depending on
what your instructor or style guide
format calls for.
*Since you want to allow for two
styles of numbering, make sure you
select the Start At button under
Page Numbering (since you do
not want to continue with the
same style of numbering from
the previous section).
|
 |
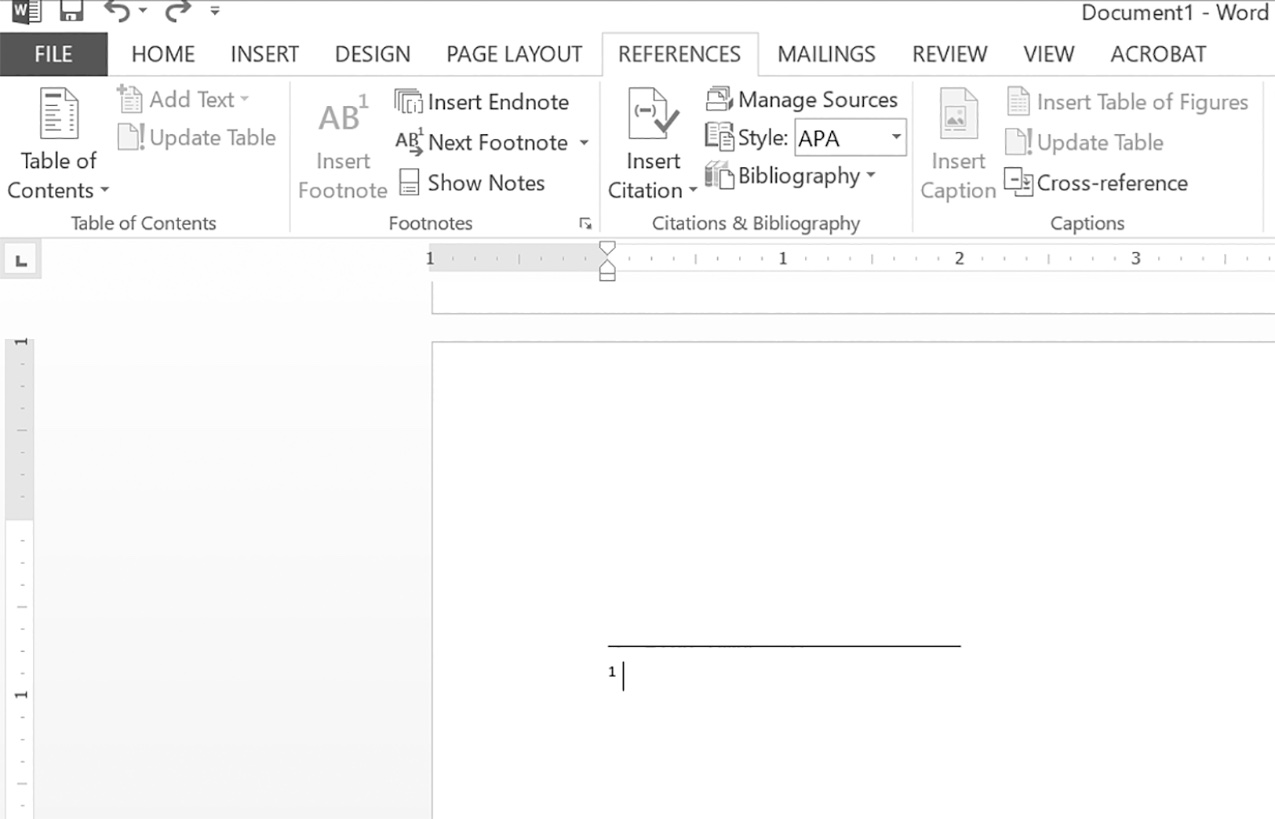
Table 46. Generating endnotes
|
Step
|
Visual
|
|
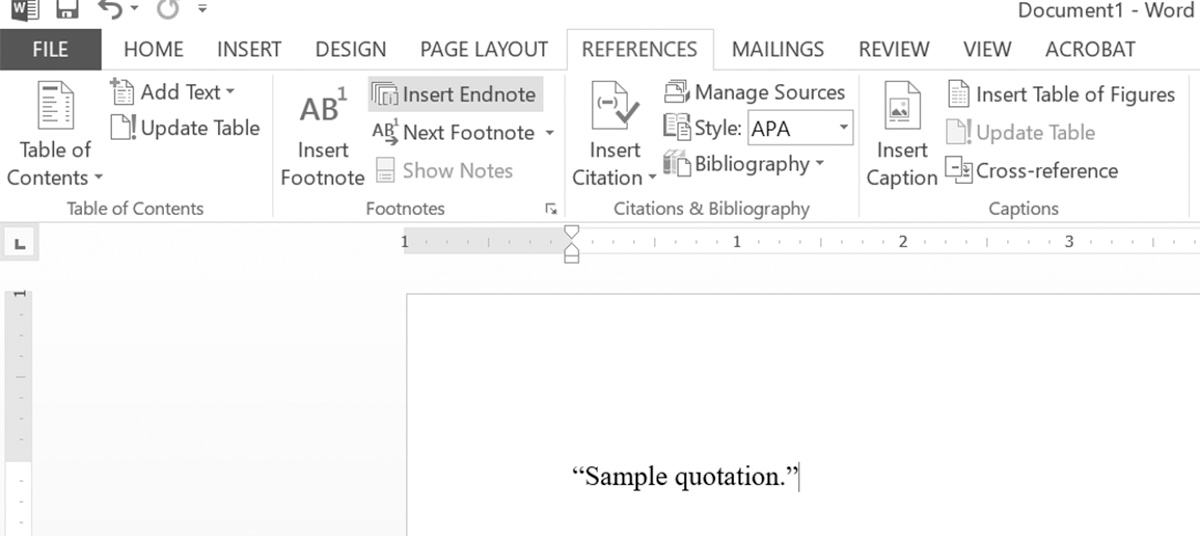
Click on References
on the top toolbar.
|

|
|
Place your curser next
to the quotation, paraphrase,
or summary in your paper, and click.
|
|
|
While you are at this
particular point in your text,
click on Insert Endnote on
the dropdown list. If you
have been instructed to use
footnotes, you would click
Insert Footnote.
|
|
|
Microsoft Word will then
take you to the end of your
document, where you can
fill in the publication
information for the source
you cited. See chapter 9
for more information about
properly formatting endnotes
in CMOS.
|
|
|
If your endnote appears as
a Roman numeral and you
have been instructed to use
Arabic numerals, highlight
and right click on one of your
endnotes, and click Note Options.
|
 |
|
Click on the drop box under
Number Format and select
1, 2, 3 (unless instructed to
use Roman numerals).
|
 |
|
Click the Apply button at
the bottom right-corner of the menu.
|
 |
Microsoft Word’s default setting is to place the endnotes after the last segment of text. Therefore, you will want to create a section break in order to place the endnotes after the bibliography. Table 47 provides information on how to create this kind of section break.
Table 47. How to create a section break between the endnotes and the bibliography
|
Step
|
Visual
|
|
Create your bibliography section
if you have not already done so.
|
You will notice the endnotes still go at the end of the bibliography. The endnotes should precede the bibliography.
|
|
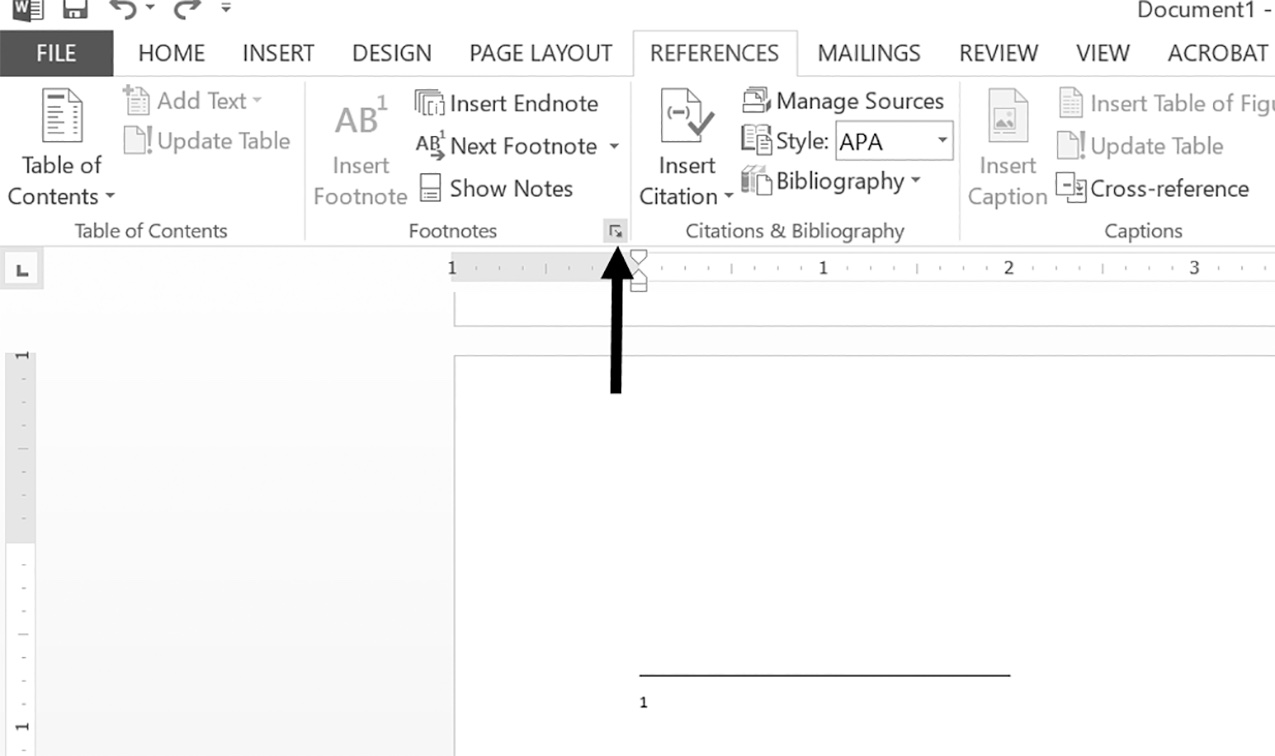
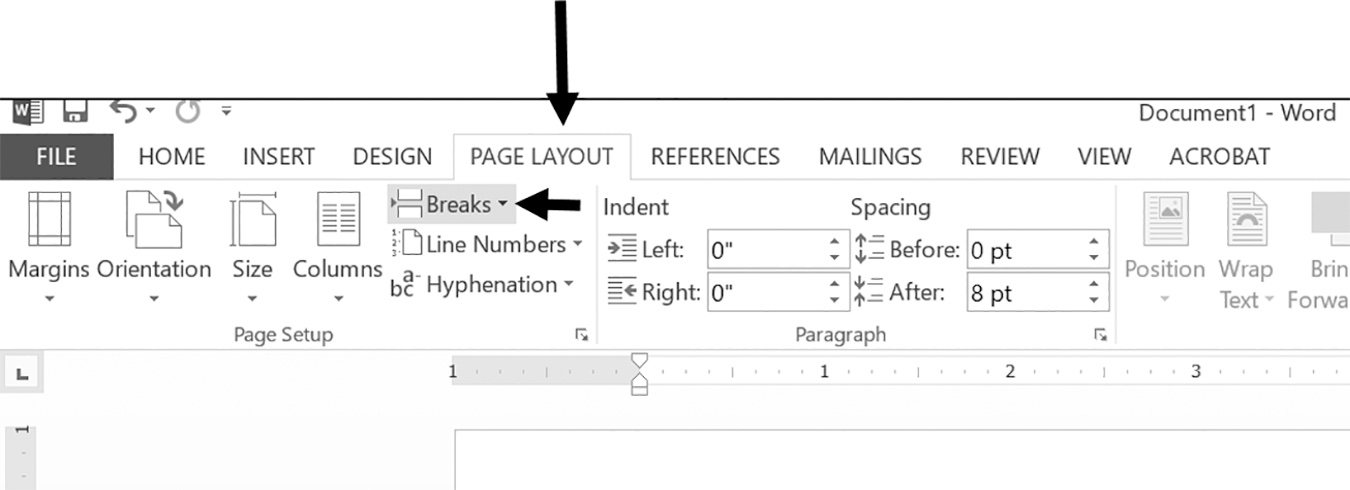
Make sure your cursor is
in the endnotes, and click
Page Layout.
Click Breaks.
|
|
|
If the following page is an
even-numbered page, click
Even Page. If the following
page is an odd-numbered page,
click Odd Page.
|
 
|
|
Right click on one of the
endnotes, and click Note Options.
|

|
|
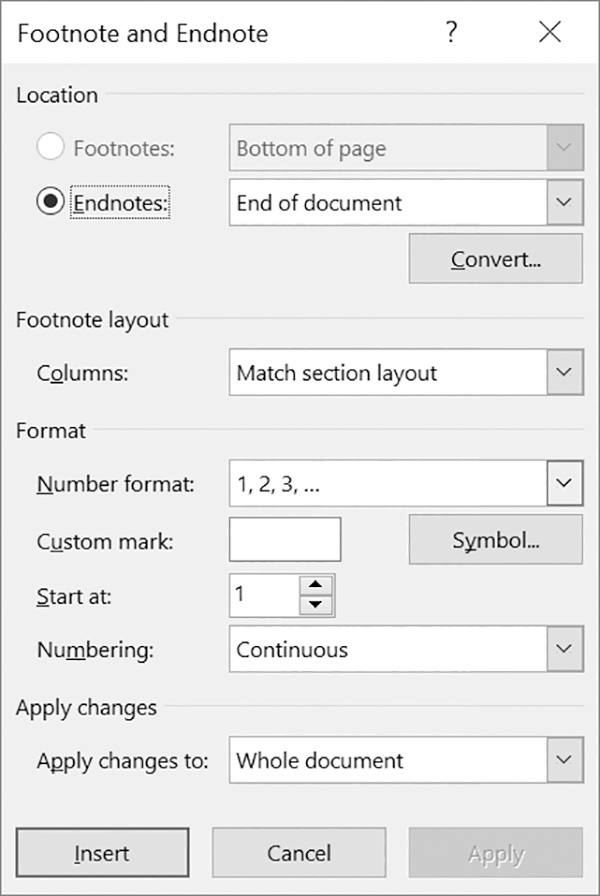
Within Note Options, click
the drop-down menu next to
Endnotes and click End of
section instead of End of
document. This will move
your endnotes to the end
of the section you just created
between the end of your document and the bibliography.
|
 |
CSG B.1.5 Section Headings
If you are writing a longer paper or report, you may want to include section headings. Headings can help your reader easily navigate the document. In terms of their content, headings should be clearly connected to the key words and concepts in your thesis. The headings and subheadings should carry the story line of your argument through the paper. As you design and format your headings, be sure to follow CMOS recommended practices for headings at different levels. Here are several CMOS recommendations:
• Use parallel forms in writing your headings.
• Use up to three levels of hierarchy; more than this can confuse the reader.
• Use headline style capitalization for headings.
• In formatting headings and subheadings, be consistent in size, placement, bolding, and font.
Kate L. Turabian’s A Manual for Writers of Research Papers, Theses, and Dissertations, 8th edition, a student version of The Chicago Manual of Style designed for those writing research papers, recommends the five levels of CMOS headings described below:
• Level 1 headings (such as your title) should be centered and in bold type.
• Level 2 headings should be centered in regular type.
• Level 3 headings should be flush left and in bold or italic type.
• Level 4 headings should be flush left and in regular type.
• Level 5 headings should run in at the beginning of a paragraph in bold or italic type.
Figure 35 provides a model of the different levels of headings.
Figure 35. Levels of headings example
Level 1 Title
Level 2 Main Section
Level 3 Section
[text begins below heading]
Level 4 Subsection
[text begins below heading]
Level 5 Run-in heading for subsubsection [text begins immediately following]
Source: adapted from Kate L. Turabian, A Manual for Writers of Research Papers, Theses, and Dissertations, 8th ed., quoted in “Chicago Manual of Style Headings,” Purdue Online Writing Lab, last modified February 16, 2018.
CSG B.2 Using Visuals in Academic Writing
Visuals are an important component of both academic research papers and oral presentations. They help to emphasize or clarify specific points; demonstrate relationships between concepts, events, and people; and simplify complex information. The number and type of visuals you need for a paper or presentation depend on your audience and your purpose. The more technical the nature of your topic, the more visuals may be required. Visuals engage your readers or audience members with the content—particularly those who are more inclined to learn through visual means—and further emphasize your credibility. Two main types of visuals discussed in this section of the guide are figures and tables. Figures are images that are set off from the text to illustrate a point the author is making or provide a visual reference of a concept, process, map, or situation. Tables are lists of information presented in rows and columns.
Step One: In-Text Reference to the Visual
Prior to placing the figure or table in your paper, you need to name the figure in the text and let readers know where it will be located for easy reference. Examples of text references—see figure 1, refer to table 5—occur throughout this guide. Text references should appear before the figure or table in the text of the paper—according to The Chicago Manual of Style, 17th edition, “the image may precede the reference only if it appears on the same page or same two-page spread as the reference or if the text is too short to permit placing all figures and tables after their references.” When discussing the figure or table in the body of the paper, make the words figure and table lowercase unless used as the first word in a sentence.
Step Two: Visual Consistency and Clarity
When labeling and formatting visuals, it is best to ensure consistency within the table or figure and between tables and figures, as well as with the style of the text in the paper. For example, figure labels should be in Times New Roman font if the rest of the text is Times New Roman font, and if one figure label is bold and centered, the other figure labels in the paper should be bold and centered.
When using tables and other visuals or figures in a paper, number tables separately from figures. Give each its own number, and use Arabic numerals (e.g., table 1, figure 3). When listing visuals in the front matter, tables are listed separately from figures as well.
Further, it is important to make your visuals clear for readers who may be unfamiliar with the technical content or visualizations of your ideas. First, provide a title that clearly and concisely identifies the subject. Readers should be able to understand the information presented in the table, even if they are unfamiliar with your subject. Second, in regard to use of abbreviated language, The Chicago Manual of Style, 17th edition, states, “The meaning of any abbreviation taken from the text should be clear from the table alone in case the table is reproduced in another context, apart from the text.” Third, you can include totals in a table if they are useful to the paper or presentation. Use exact numbers/values, especially if a percentage equals more or less than 100 percent.
Step Three: Citing the Visual
If you borrow the figure, table, or data within your own figure or table, you need to cite that information for readers. Rather than cite in an endnote per the guidelines in chapter 9, CMOS advises you to add a source citation directly below the table or figure. The word “source” is capitalized, italicized, and followed by a colon. If adding a note explaining the figure or table, this would follow the source citation below the figure or table and start with the word “note” capitalized, italicized, and followed by a colon. You can think of this as a table footnote—the main differences are as follows:
1. The citation is placed directly below the figure or table.
2. The citation is not numbered as other endnotes are in a list.
3. The citation is preceded by the word “Source.”
See figure 36 for an example.
Figure 36. American attitudes toward cyber threats
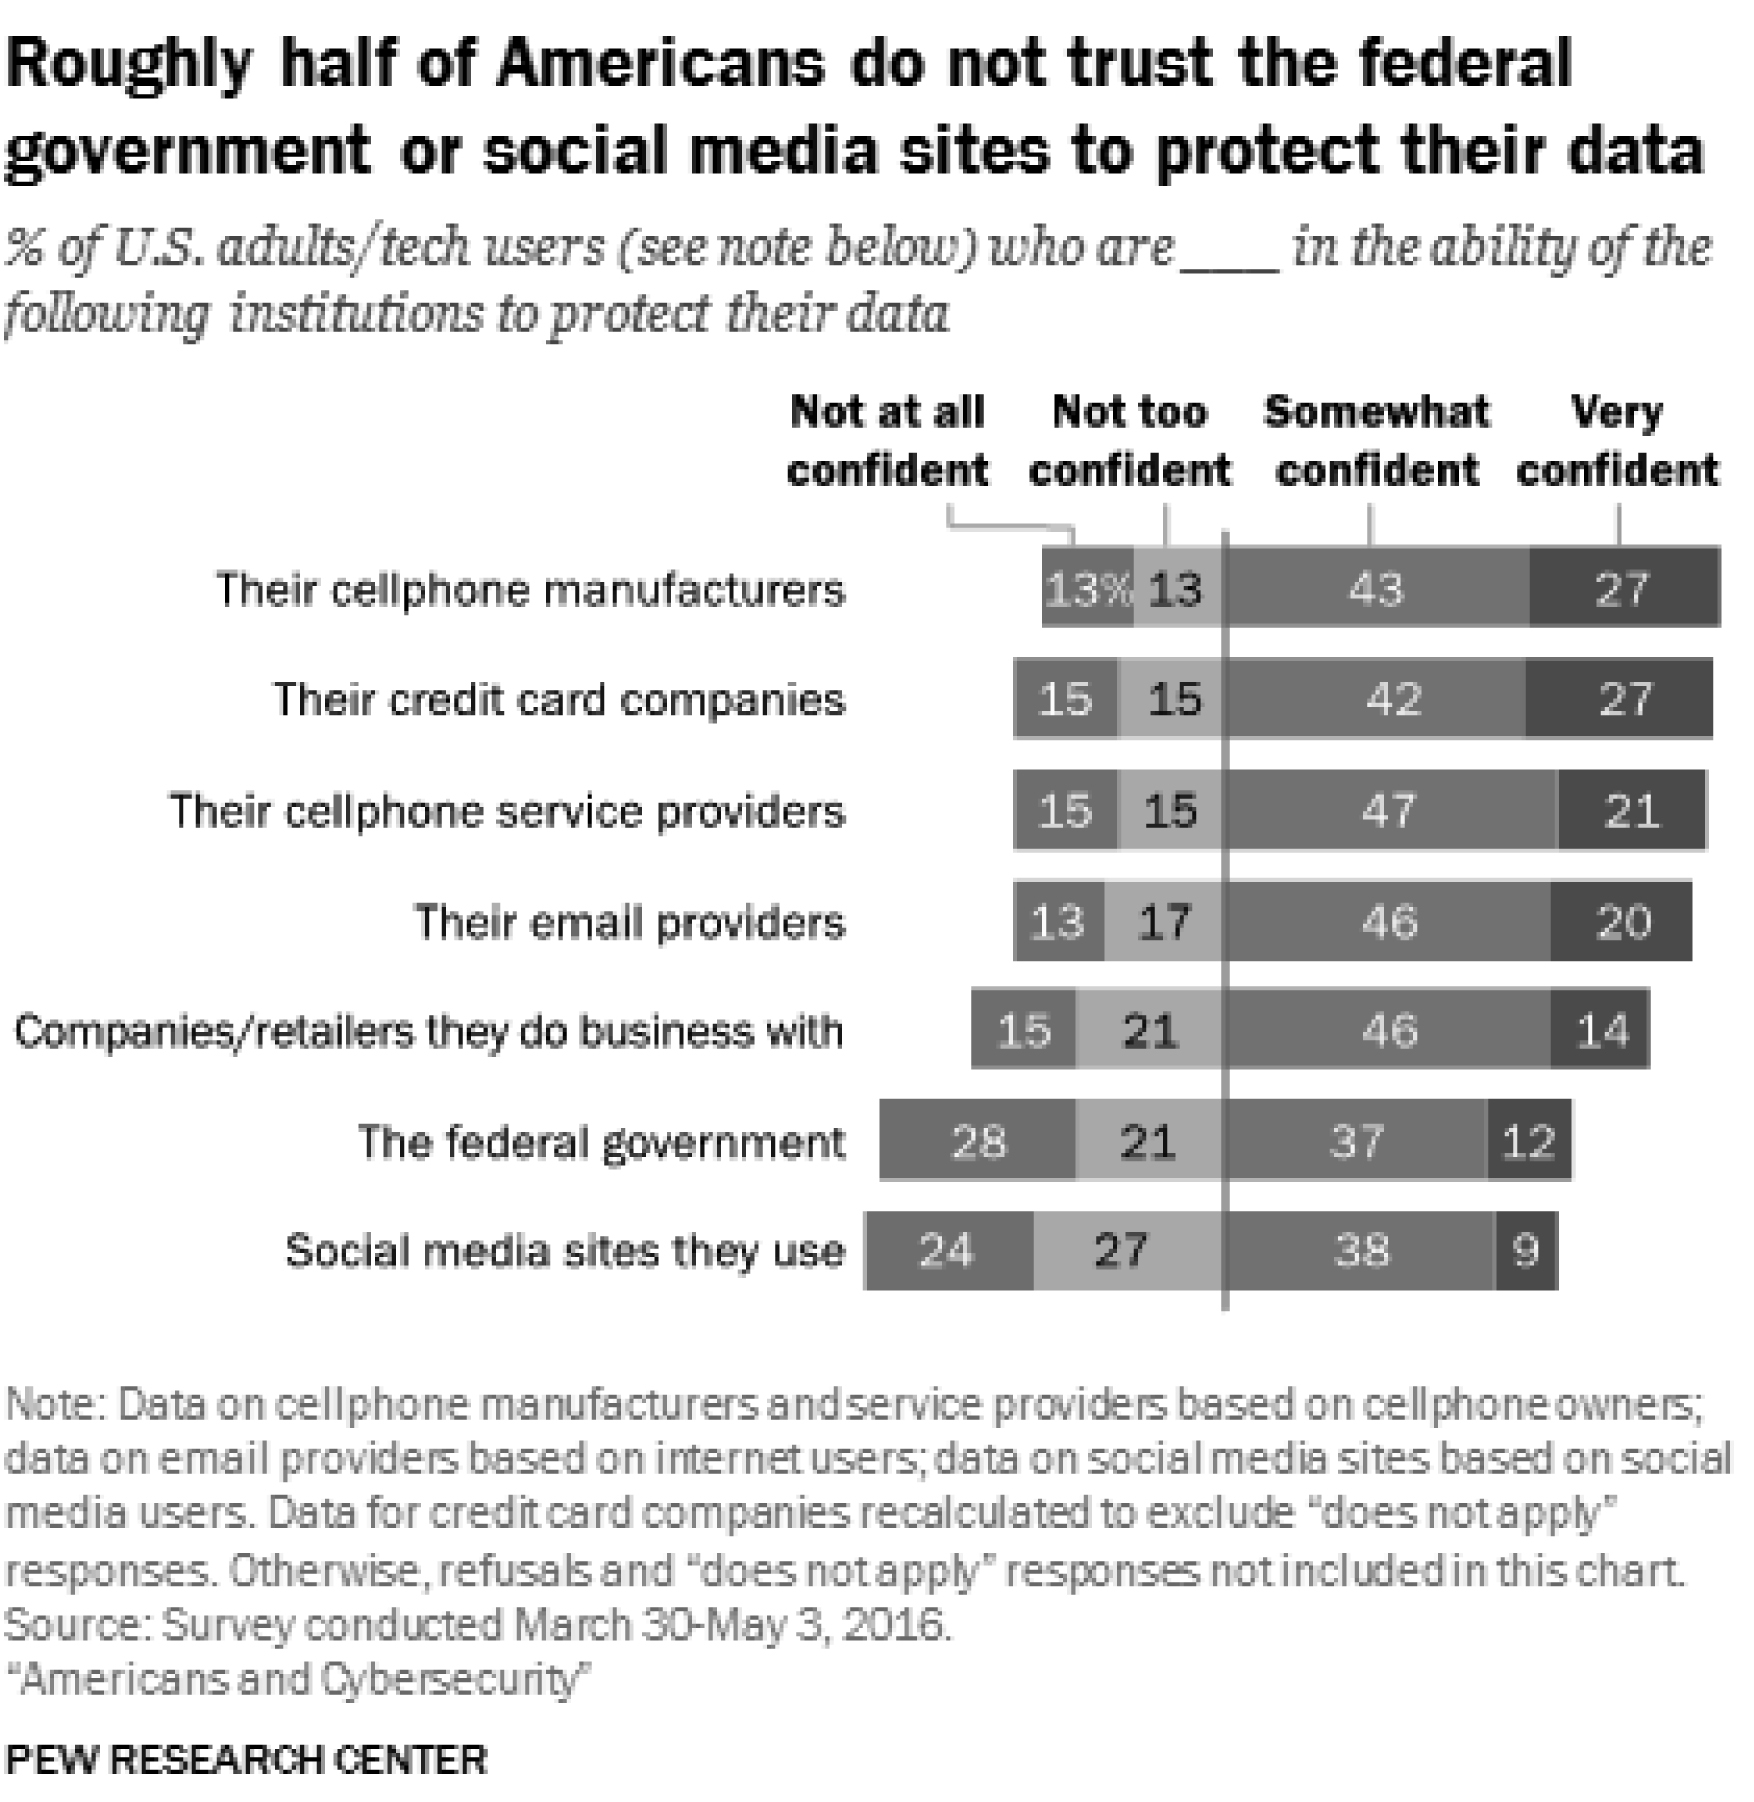
Source: Kenneth Olmstead and Aaron Smith, “Americans and Cybersecurity,” Pew Research Center, January 26, 2017.
Note the placement of the label, consistent with the other figures in the style guide, and the source citation. The source information—author, title of the source, publication title, and date are listed in much the same way as that of an endnote.
Table 48 is an example of a table that is reproduced using data from another research or organization. Table 49 is an example of a table created from the author’s original research.
Table 48. Using data to develop a figure: most common driving violations in Union, VA, March–May 2014
|
Violation type
|
Average number of drivers cited per month
|
|
Speeding
|
111
|
|
Failing to obey a traffic sign
|
78
|
|
Reckless driving
|
42
|
|
Driving with expired tags
|
58
|
Source: data received from City of Union Police Chief, Record of Driving Violations, June 1, 2015.
Table 49. Example of a table: LCSC recorded visits, academic year 2017–18
|
Membership category
|
Number of visits to Leadership Communication Skills Center (LCSC)
|
|
Command and Staff College
students
|
2,031
|
|
School of Advanced Warfighting students
|
98
|
|
Marine Corps War College students
|
88
|
|
Faculty, fellows, and MCU staff
|
77
|
|
Total
|
2,294
|
As shown, the table is labeled with a clear title and depicts specific and clearly labeled information to be of use in the paper or presentation. Since the second table is not followed by a source line, it is assumed that this visual (and the research on which the table is based) was compiled by the author of the paper.